


In today's post I am going to show you how you can launch your website in 28 days or 4 weeks with Ocean Pro and HubSpot CMS.
So whether you are looking to purchase HubSpot's CMS to build your website or want to redesign your website, this guide is for you.
28 days may seem like a long or short time, depending on each one perspective, but to make it clear how the process works, I am going to explain in detail and guide you from the beginning, so... go ahead!
Let's start with the elements you need to have ready to launch your website with Ocean Pro and HubSpot CMS.
Website Map
A defined website map is key to successfully completing the creation of the website. In case you do not have it, it is very easy to create it, you just need a spreadsheet.
In the spreadsheet add the following columns: Page, Intent, Priority, Content. In case it is a redesign, it is worth adding the Current Traffic and Status columns.
Let´s see what to put en each column:
- Page: The name of the section
- Intention: Define the options that best suit your company, for example: Informative, Service, Contact, Legal.
- Priority: High or low. High: These are usually the pages of service, product, prices, among others, where it will be worth putting the most effort. Low: the rest of the pages: Contact, Legal, for instance.
- Content:Add a link to the document that contains the information you are going to use when creating the page.
- Current Traffic: The average monthly traffic that page receives. This will help you decide what to do with it.
- Status: Improve, Maintain, Delete. In a redesign, in addition to the visual aspect, it is recommended to improve the pages that have poor performance and avoid making major changes in those that work well, as well as debug and eliminate those that are not useful.
You can add more columns. It all depends on the size of your project.
With this done, let's go to the next point.
Page content
In my experience, the content is usually the element that takes the most time, but so this does not happen to you, I have covered that part for you. The only condition is that you always put your client at the center of everything.
To begin with, your client is only interested in knowing what you can offer him, whether it is to solve a problem, improve something or avoid certain things, etc.
So, although of course you can mention the years you have been in the market and the medals and other awards you have won... at first, it is enough that the message of what you can offer is clear.
With that in mind, avoid using words that only you or your entire industry knows. I give you an example to illustrate it.
For that example we will take the digital marketing industry, which has a vast and extensive number of terms and definitions.
CRO service: We improve the CRO of your landing page
Most digital marketing agencies probably know what the above line is about, and maybe a couple of prospects as well, but the vast majority of clients who could benefit from it will not.
If you are one of those who do not know what CRO is, but you are interested in knowing how you can achieve more contacts without necessarily having to make more landing pages or pay more for advertising, a text like the following may be more useful for you.
We improve the conversion rate of your pages, in order to generate more contacts and greater growth
So it sounds more understandable for a higher percentage of people, right? In this example, it is just the title, the rest is missing.
However, the point I want to make clear is that it is always best to go for the simple. It is usually longer, but I assure you that your audience will appreciate it, and also your pocket if we talk about investment in advertising.
With these two points clear, let's move on to what corresponds: the creation of the website.
To make it easier, we are going to divide the project into 4 weeks.
First week: Create sitemap and content
You already know the importance of these two points, so this week you will have to dedicate time to the creation of the site map and to creating the contents of the high priority sections, mainly.
You can skip the unimportant pages here and fill them out directly in the HubSpot CMS if you prefer.
In order for you to work better with your team, I recommend using an online service to do it collaboratively.
Some of the tools you can use, both for these two points and for the rest of the project, are:
As for the content, in addition to what the user sees on each page, you must create a good title and a description.
This title and description are the ones that you must place on each of the pages and it is the one that is shown in the search results.
Consider a unique title and description, to learn more read How to position a page in Google?
Second week: Prepare CMS Hub and Ocean Pro
Once you have the key documents ready, it is time to dive right in with the HubSpot CMS and Ocean Pro setup.
Let's start with what we'll need regarding the HubSpot CMS.
First you have to focus on those who are going to do a redesign with a website previously in the HubSpot CMS. For those cases, use Content Preparation.
Working the pages in this section prevents you from making inappropriate changes to the current version of the website, primarily the address of each page already published in HubSpot. This is something that should not happen!
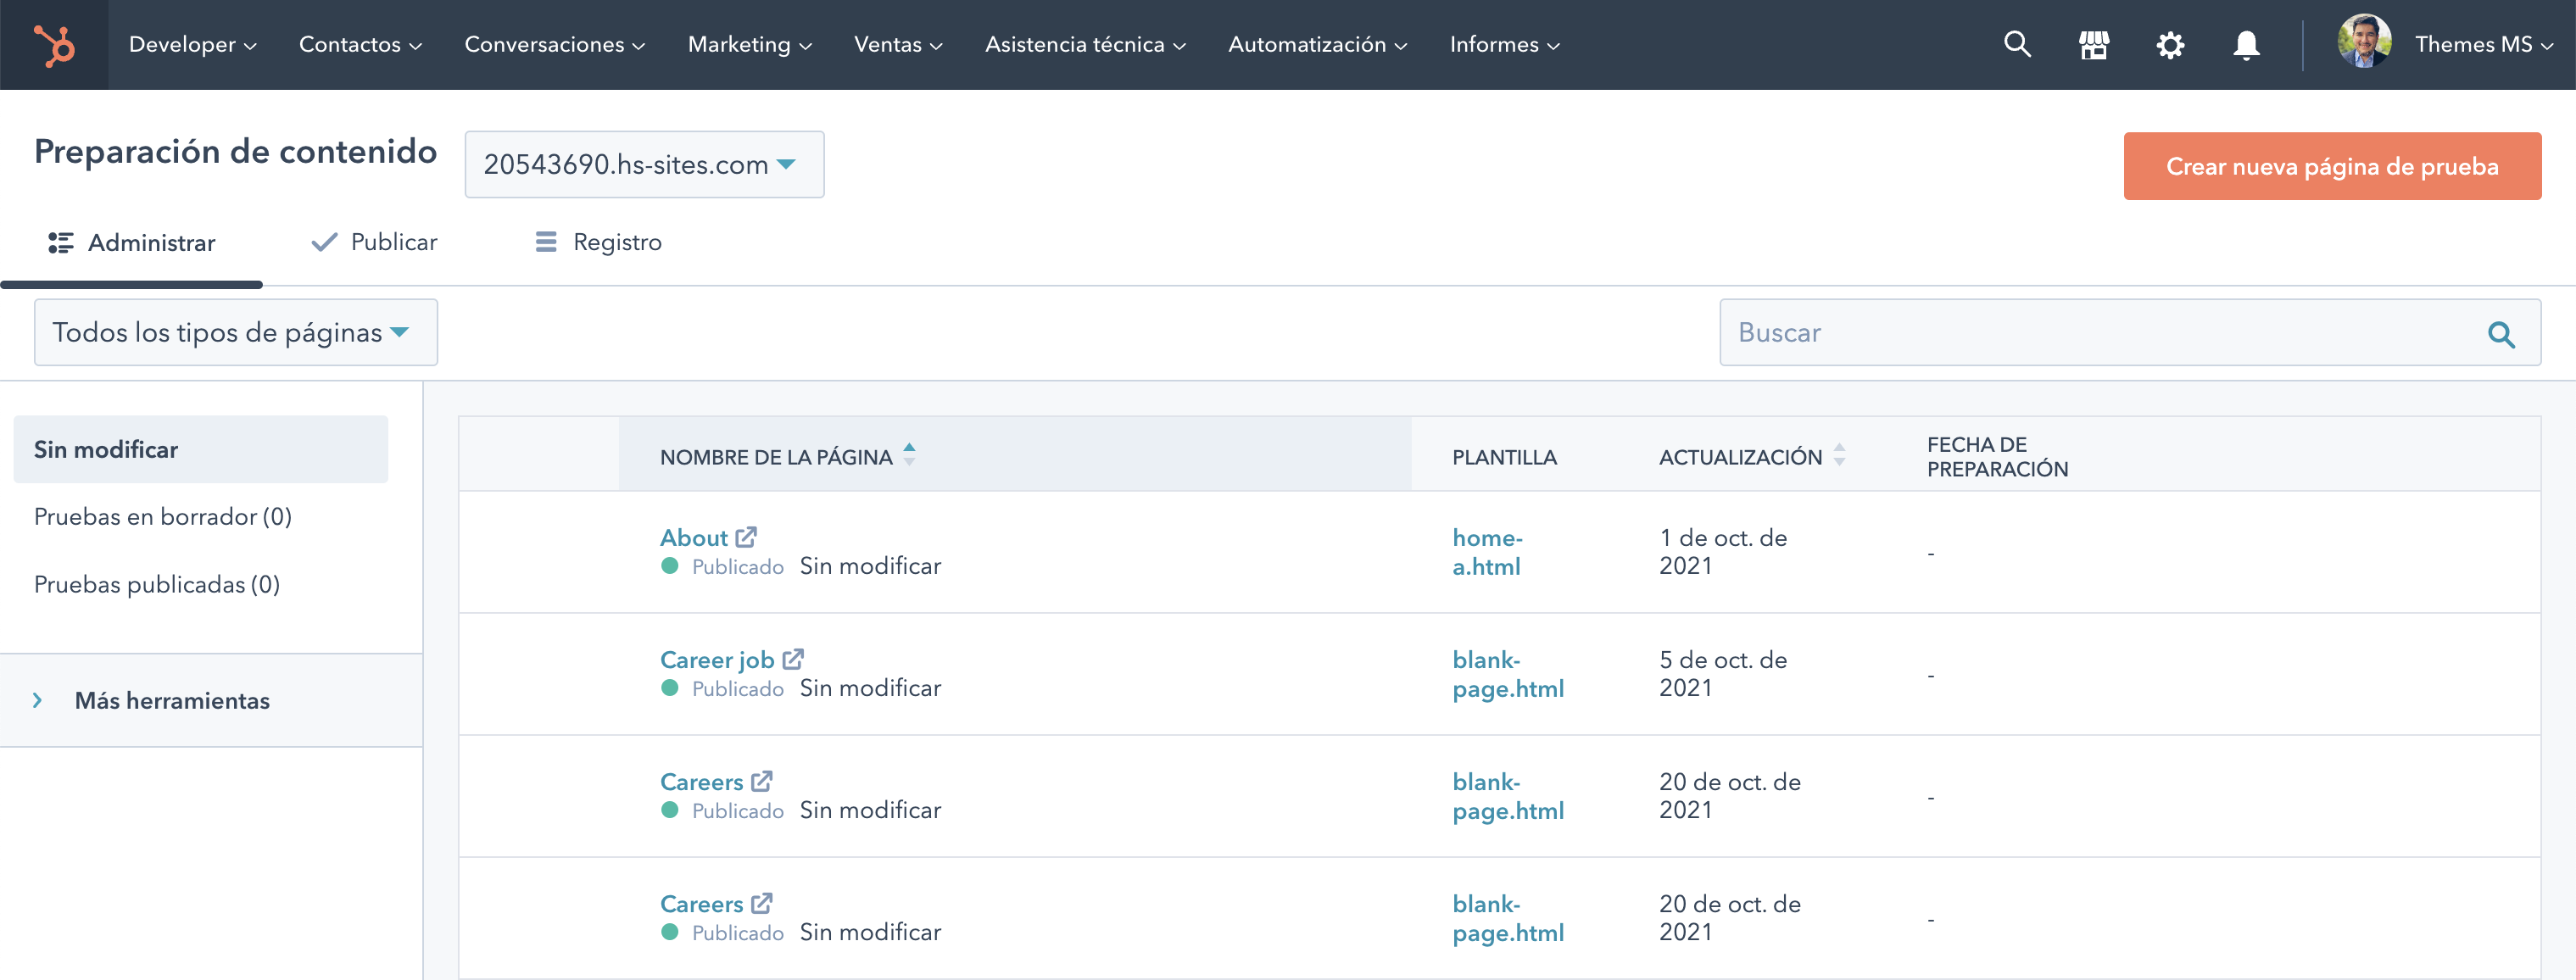
In Content Preparation you have 3 options on the left side:
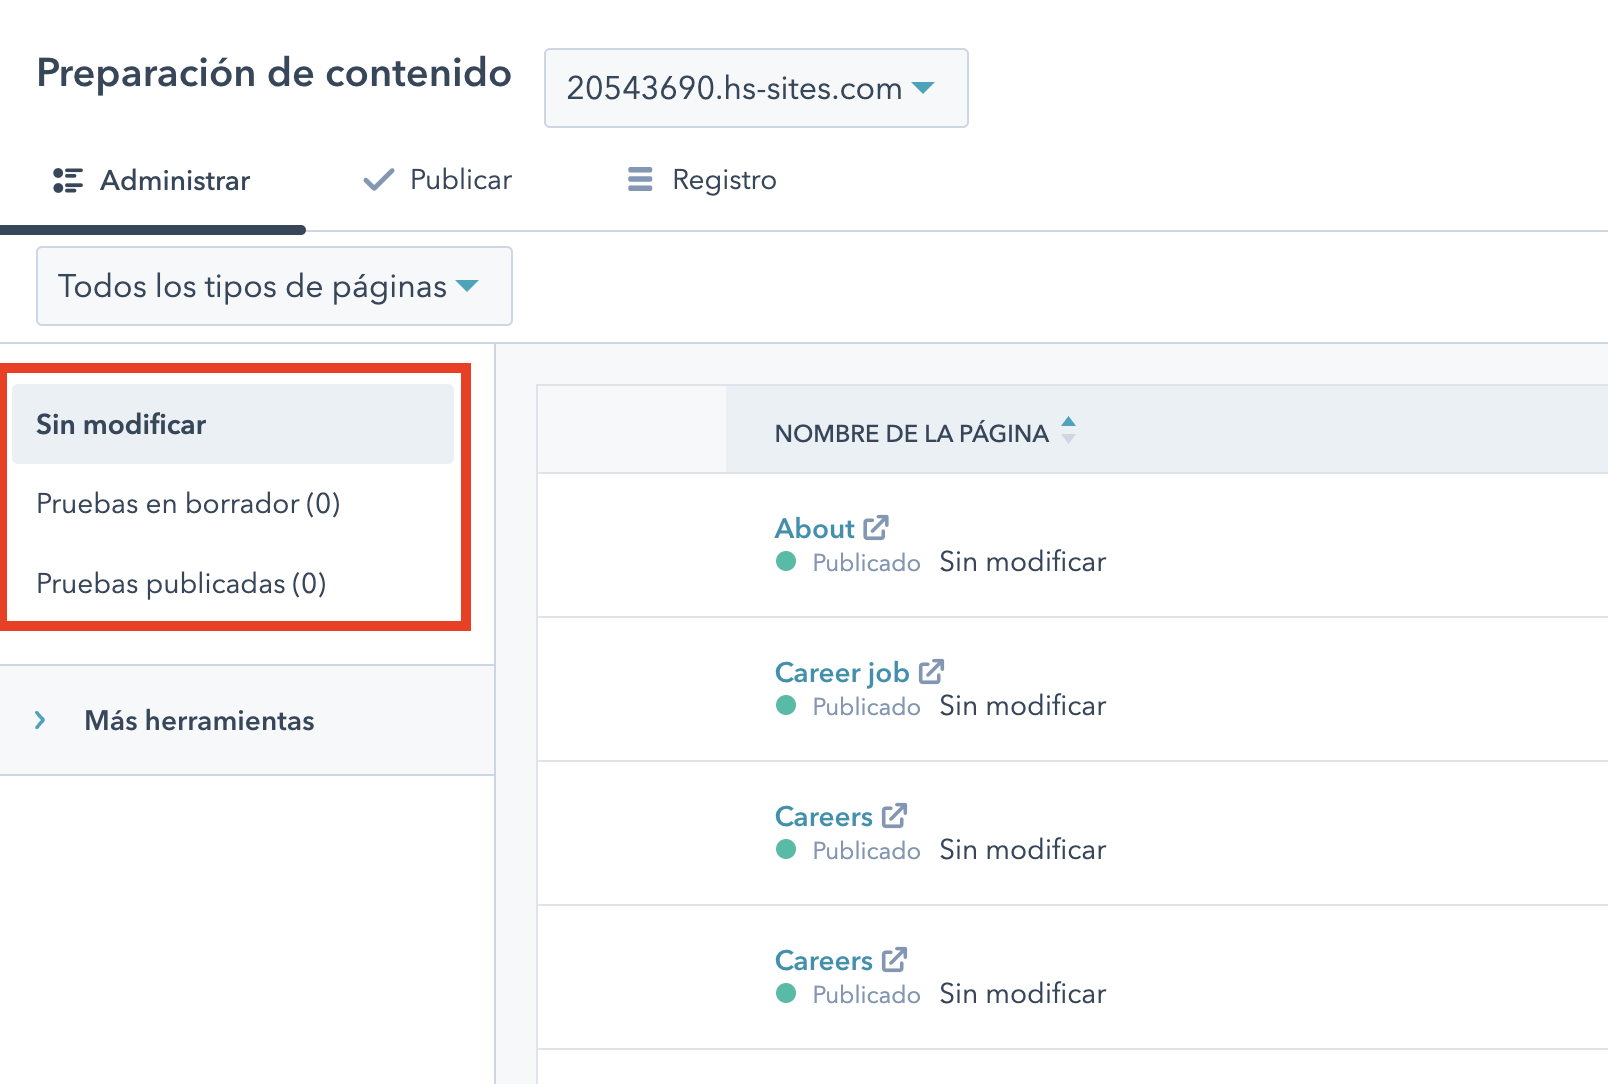
Unmodified: Will display the list of all pages that are already visible on your HubSpot-connected domain.
Draft tests: The pages that you have already started working on, but that are not published in this section, that is, content preparation
Published tests: The pages you have already published for this section. Those pages use a different test domain than the one used for the pages that go on your domain.
To start working on a page, you must be in Unmodified, hover over it, and click Prepare.
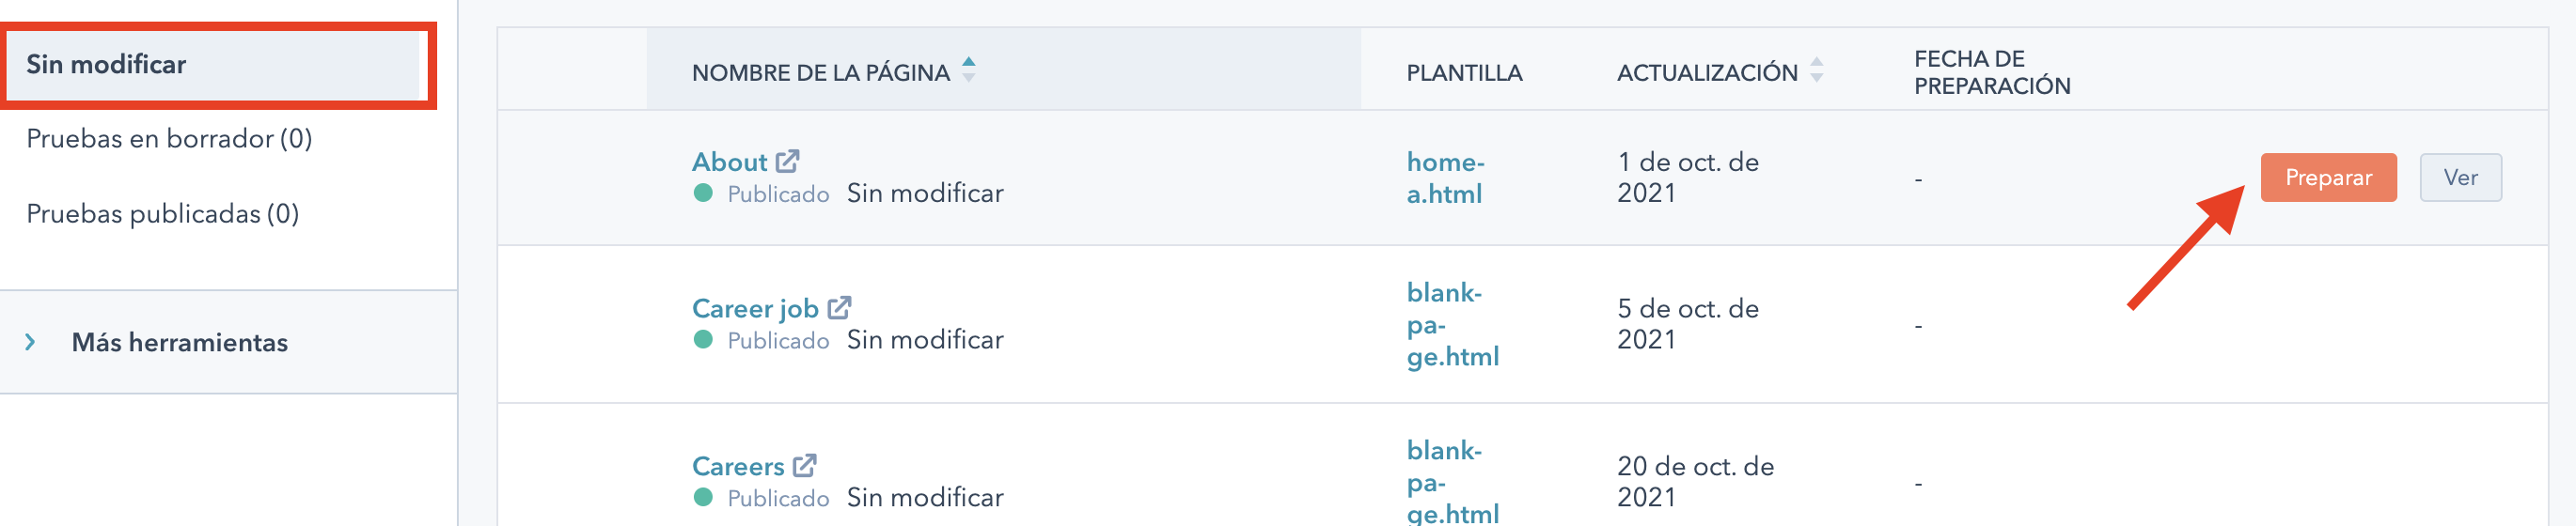
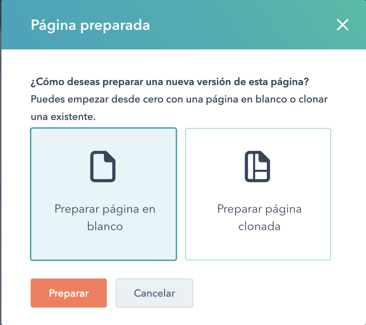
You must choose to prepare blank page, since the intention is to change the design.
From this point, the following steps apply to both.
Brand Settings
Ocean Pro inherits the branding settings created in the HubSpot account, so let's see how to set them up. Here the link of Brand Settings
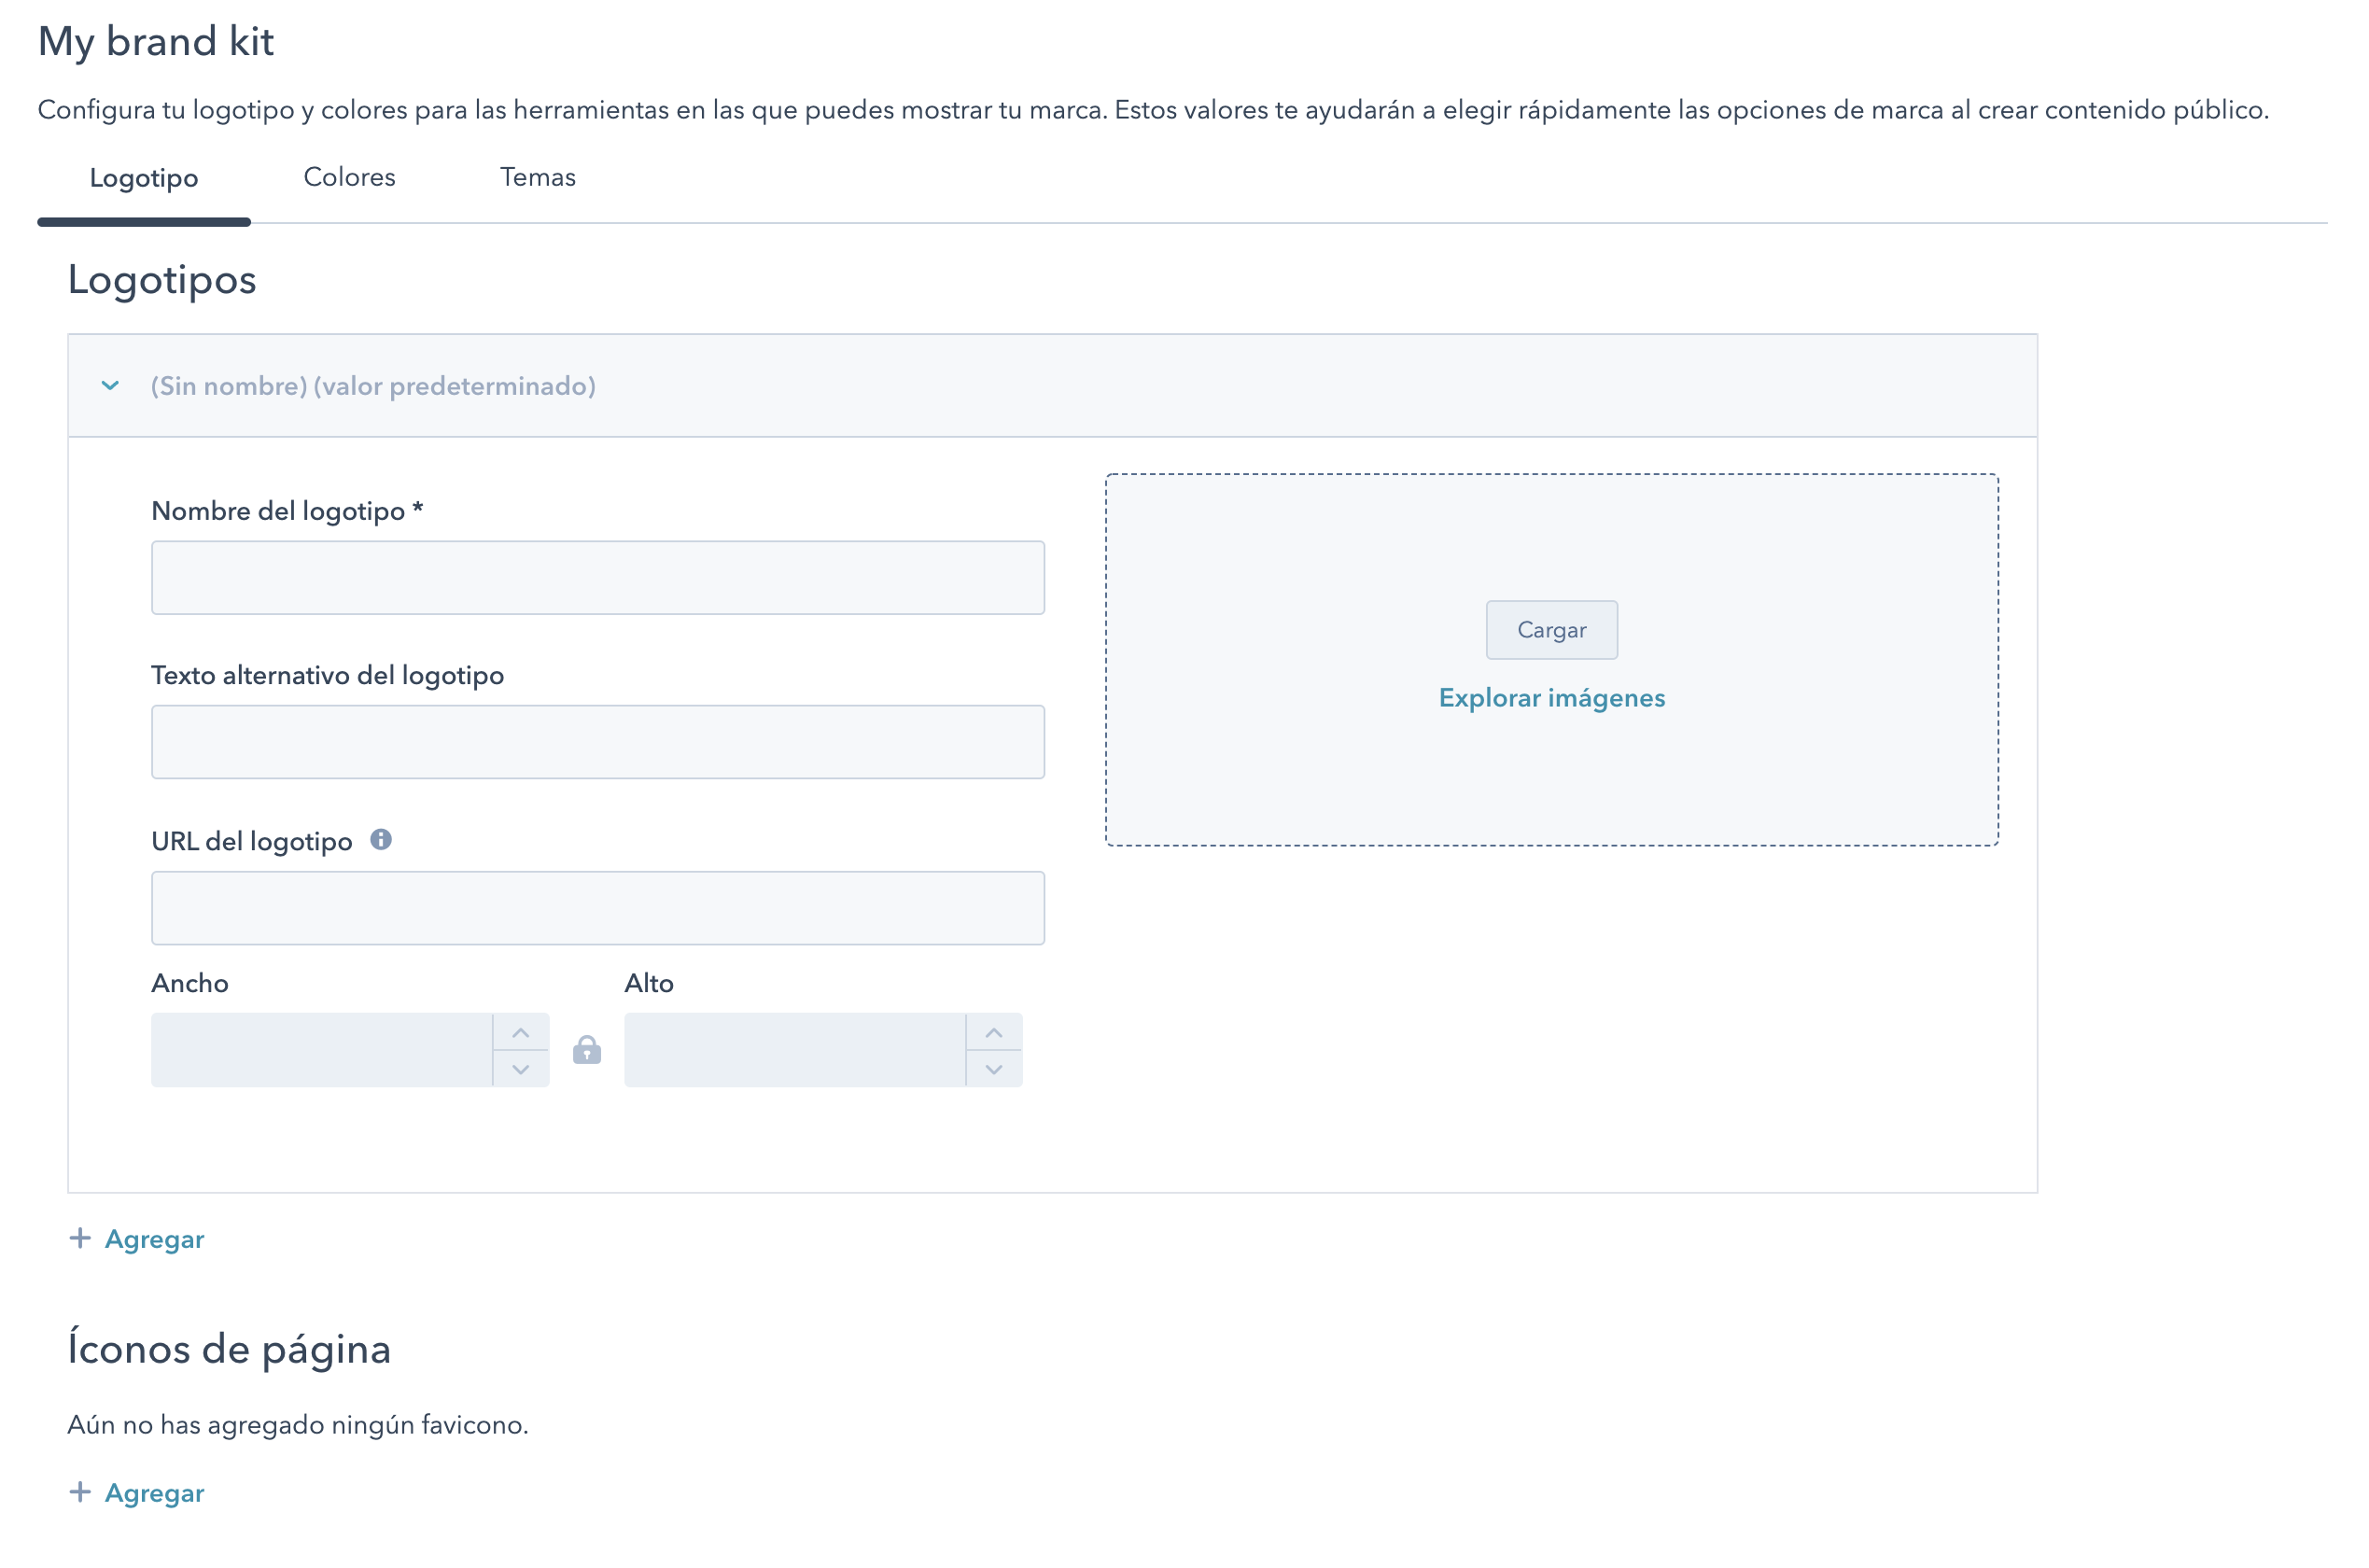
Complete all the fields in the Logo tabs and add the logo in a PNG or SVG format, this will be used in the header of the website. In the case of the page icon, it is the one that appears next to the name in the browser tab.
In the colors tab, set the colors used by your brand: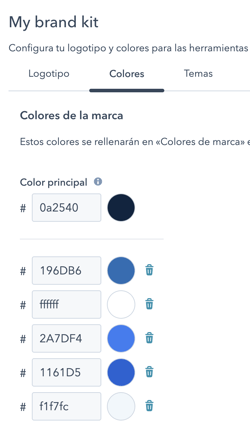
Ocean Pro takes the main and 5 additional colors. The theme settings will take the colors you define here, but you can change them later.
In the same way, it serves so that you have them at hand in the color selector of the page editor.
Create a child theme for advanced customizations or other uses
Before you start editing the Theme, it is important that you create a child theme. This will help you to have the same theme with more than one style in case it is necessary or for later customizations that you want to add.
To create a child theme go to Design Tools, and, in the @Marketplace > Media_Source > OceanPro folder, right click on Ocean_Pro and select create child theme.
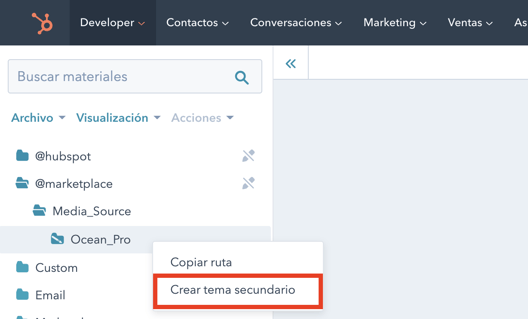
Choose a name and click Create child theme and you are done.
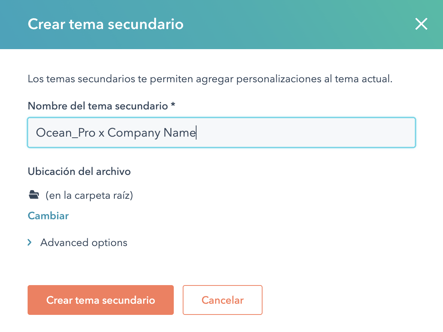
Now in your account you have Ocean Pro parent theme and Ocean Pro x Company Name child theme. As I mentioned earlier, this will allow you to have a different layout setup for each theme.
Now let's go to the settings of the Ocean Pro Theme.
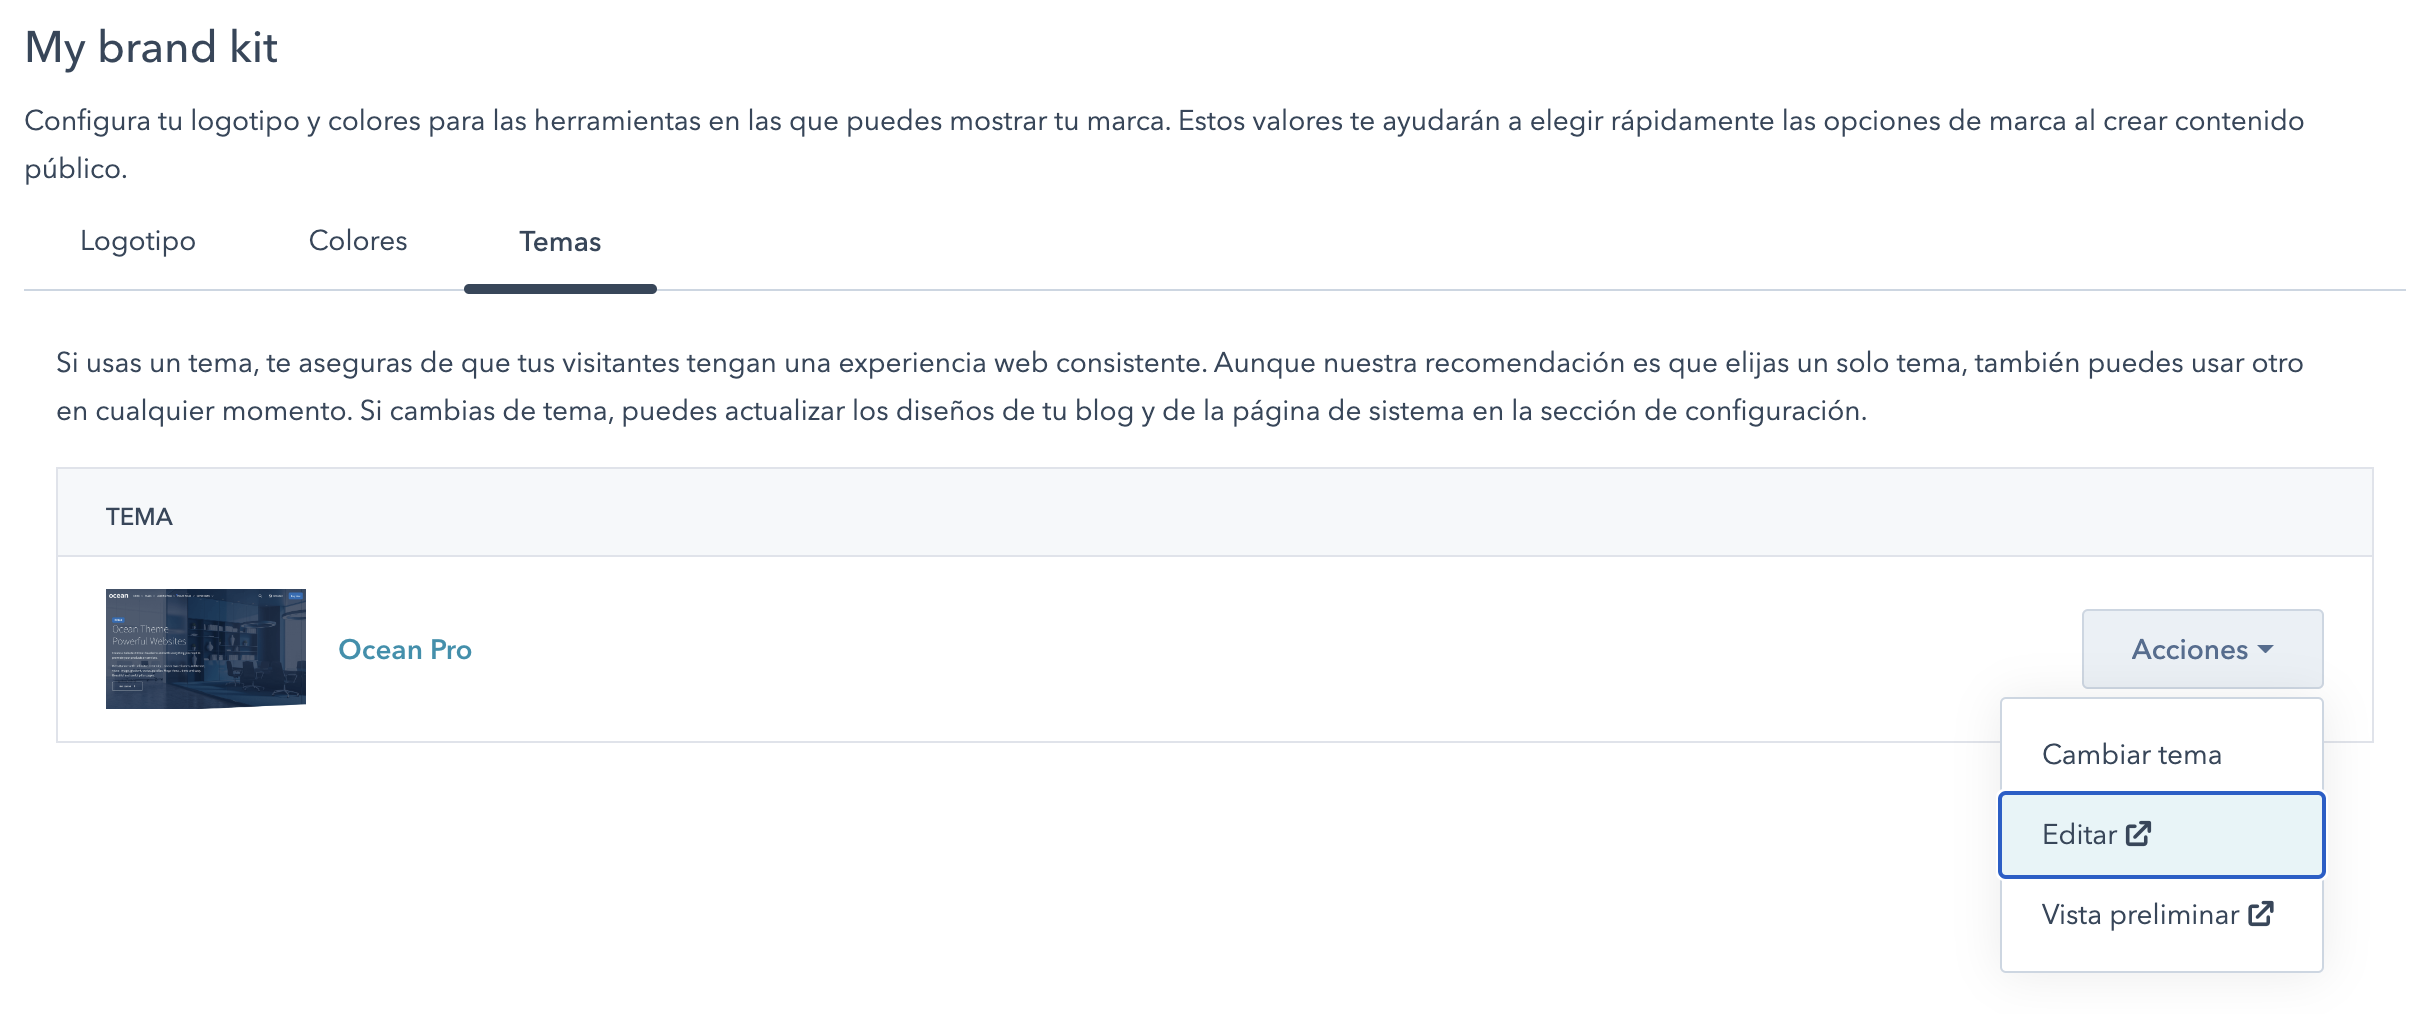
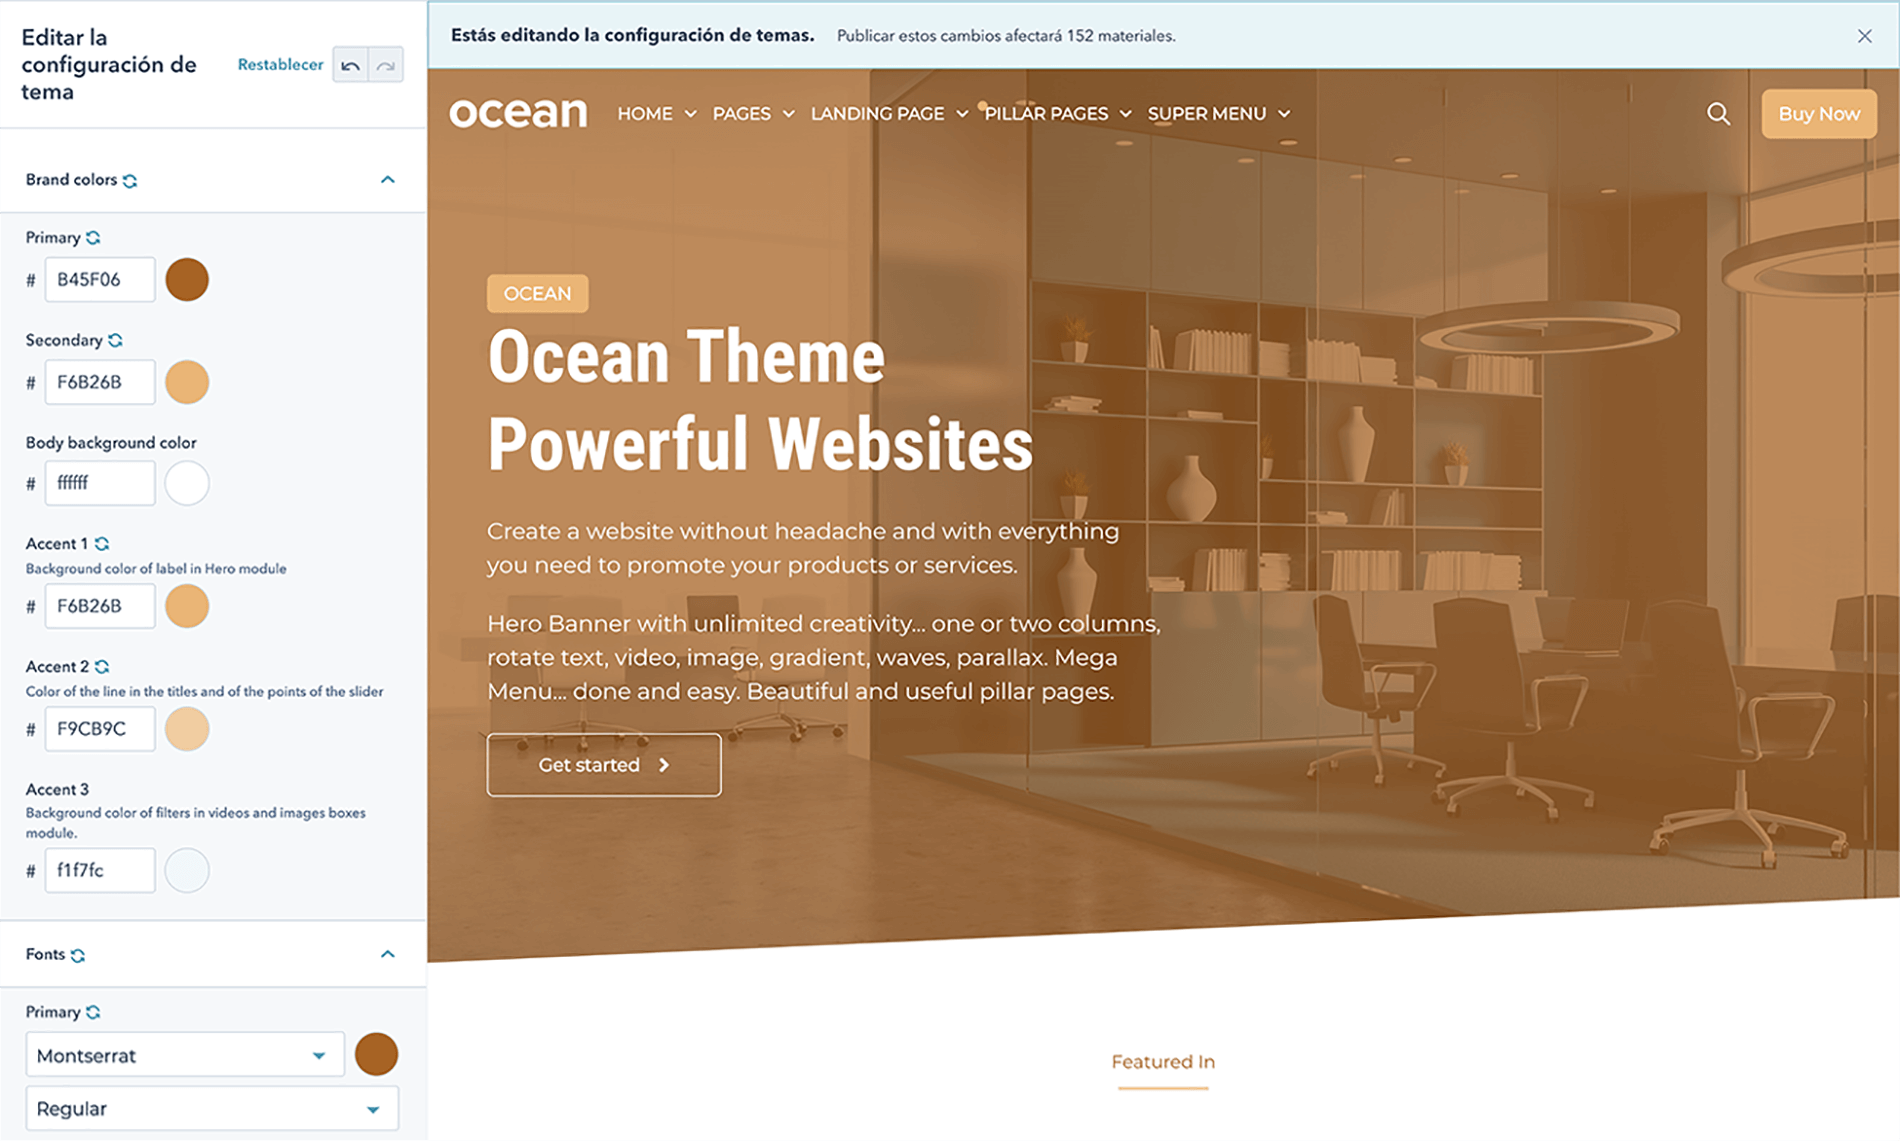
From the Brand Values section, on the Themes tab in Ocean Pro, click Actions and Edit.
In case you have not yet purchased Ocean Pro, here you have the link.
It will take you to this section:
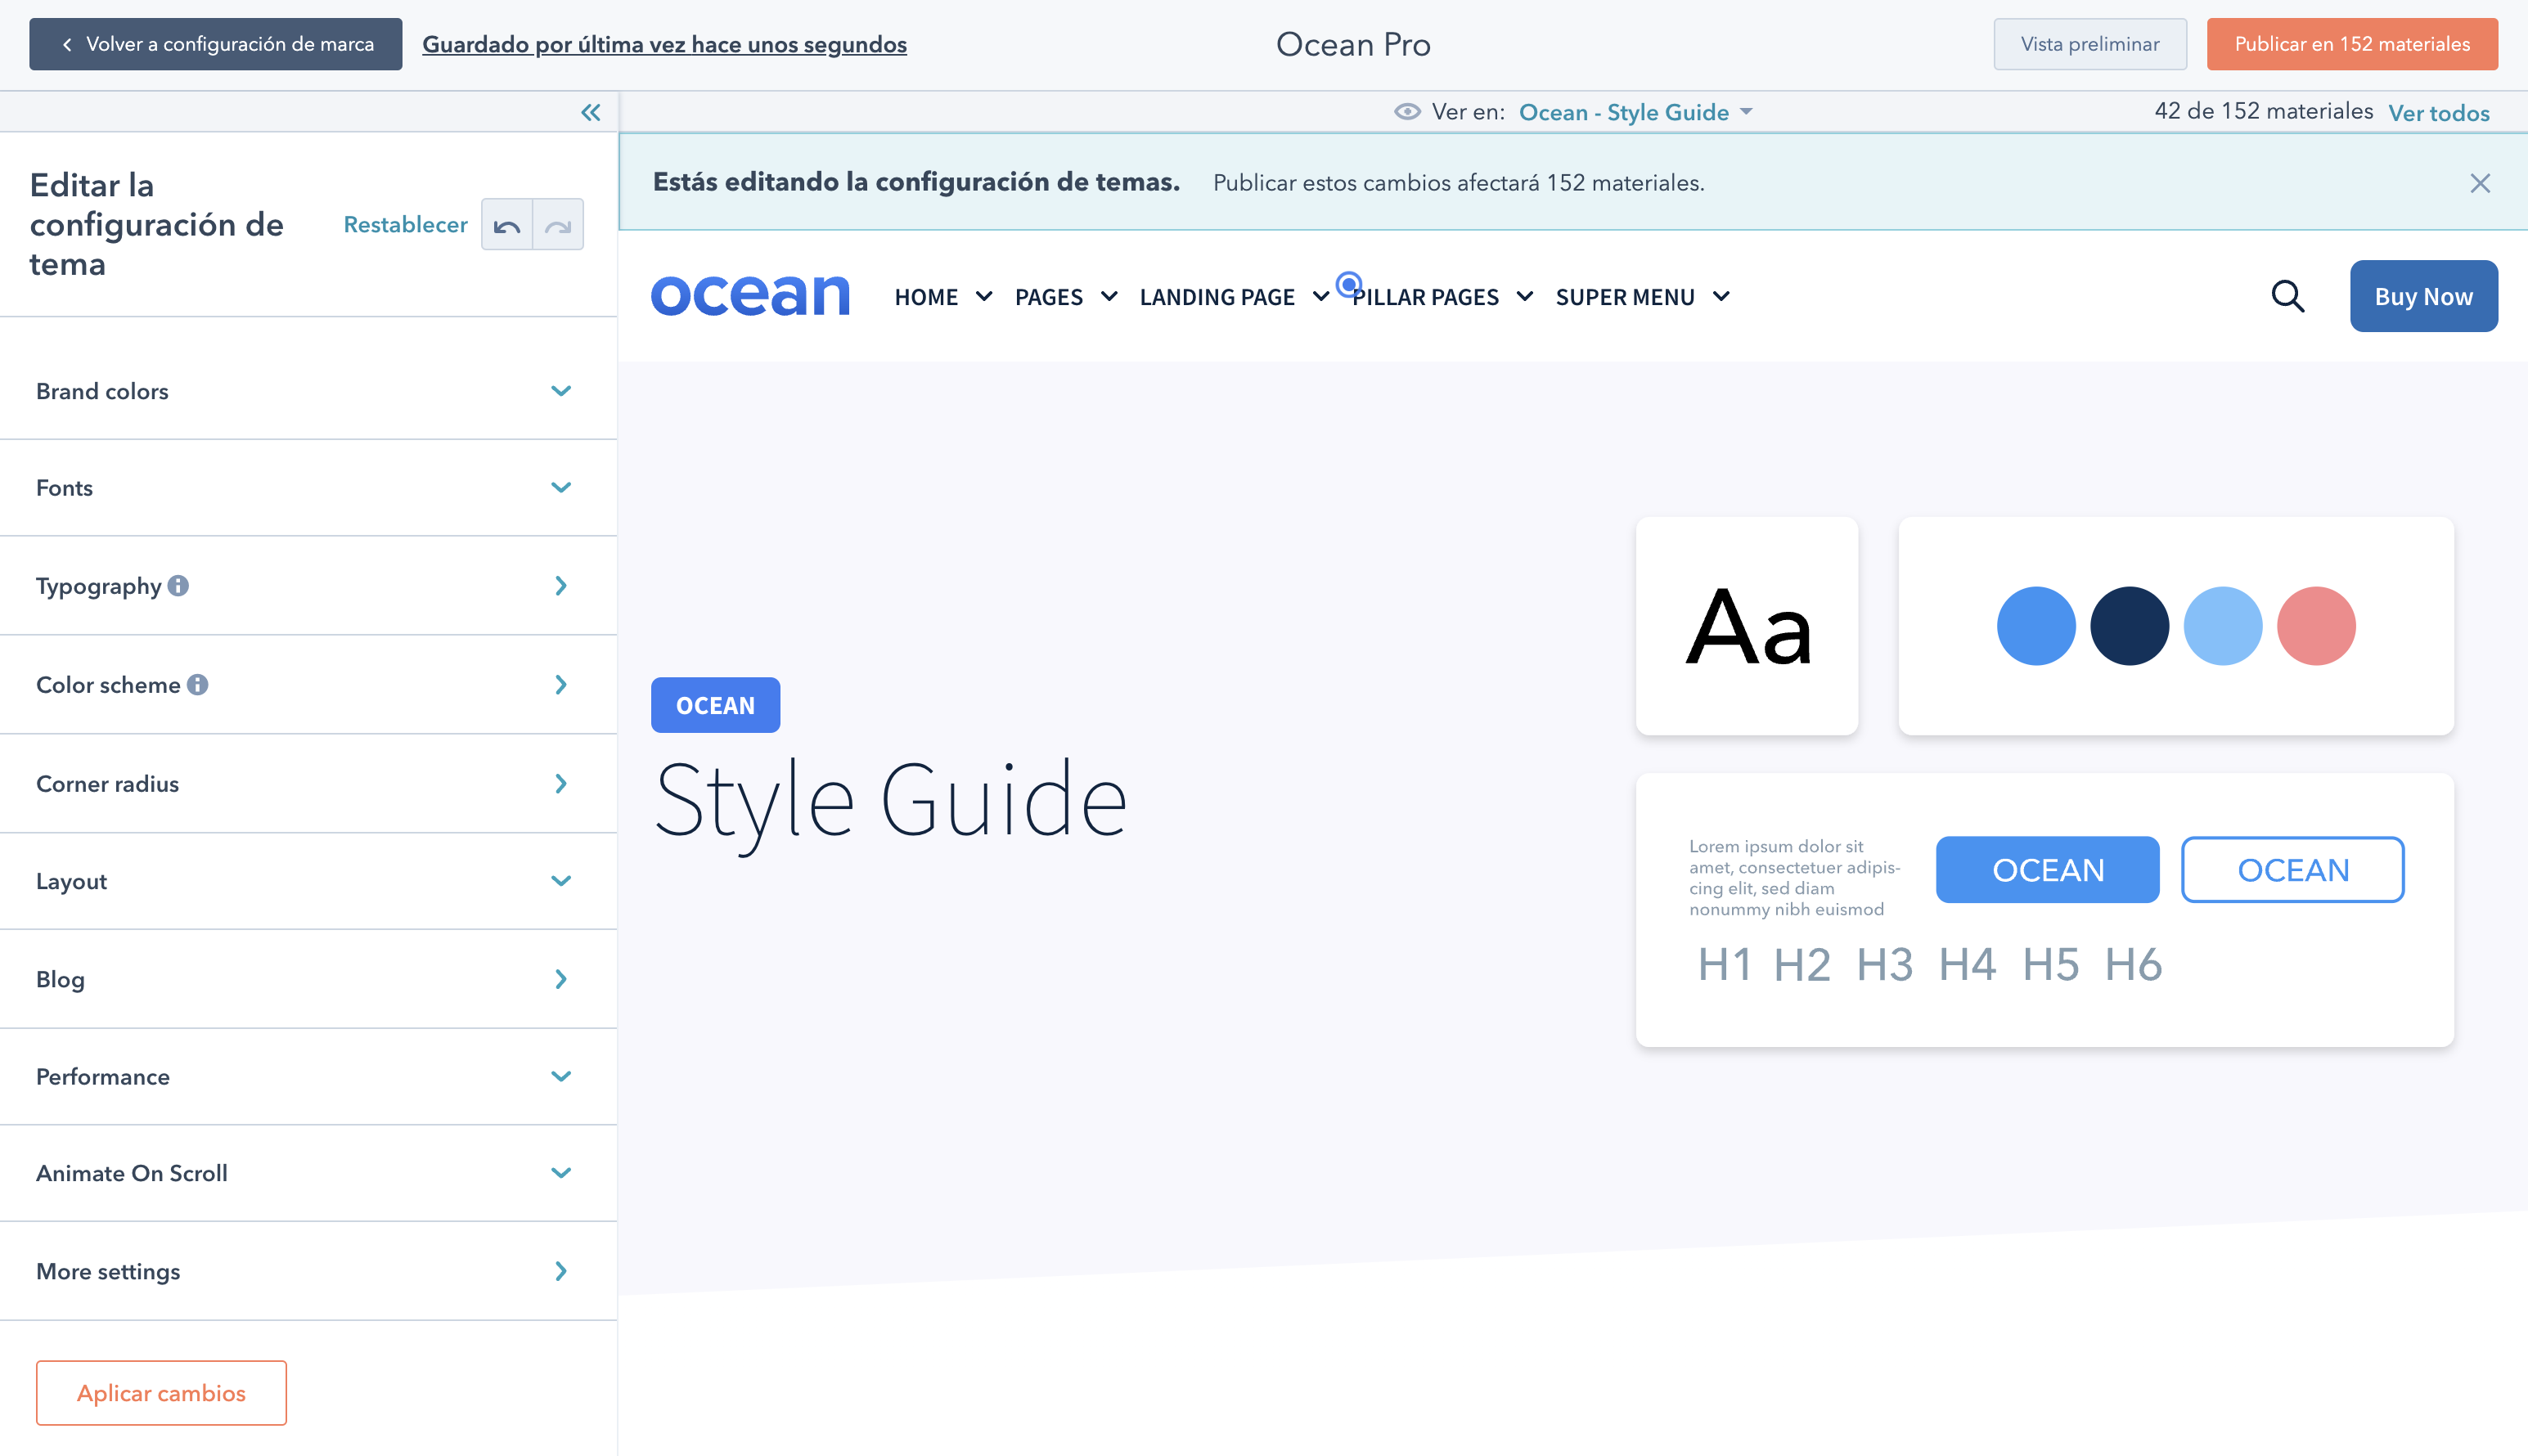
The left column contains all the customization options for the theme elements; some are visual aspects and others structural.
In the right column you can see both the templates included in the theme, and the pages that you are creating, in case you want to make an adjustment later.
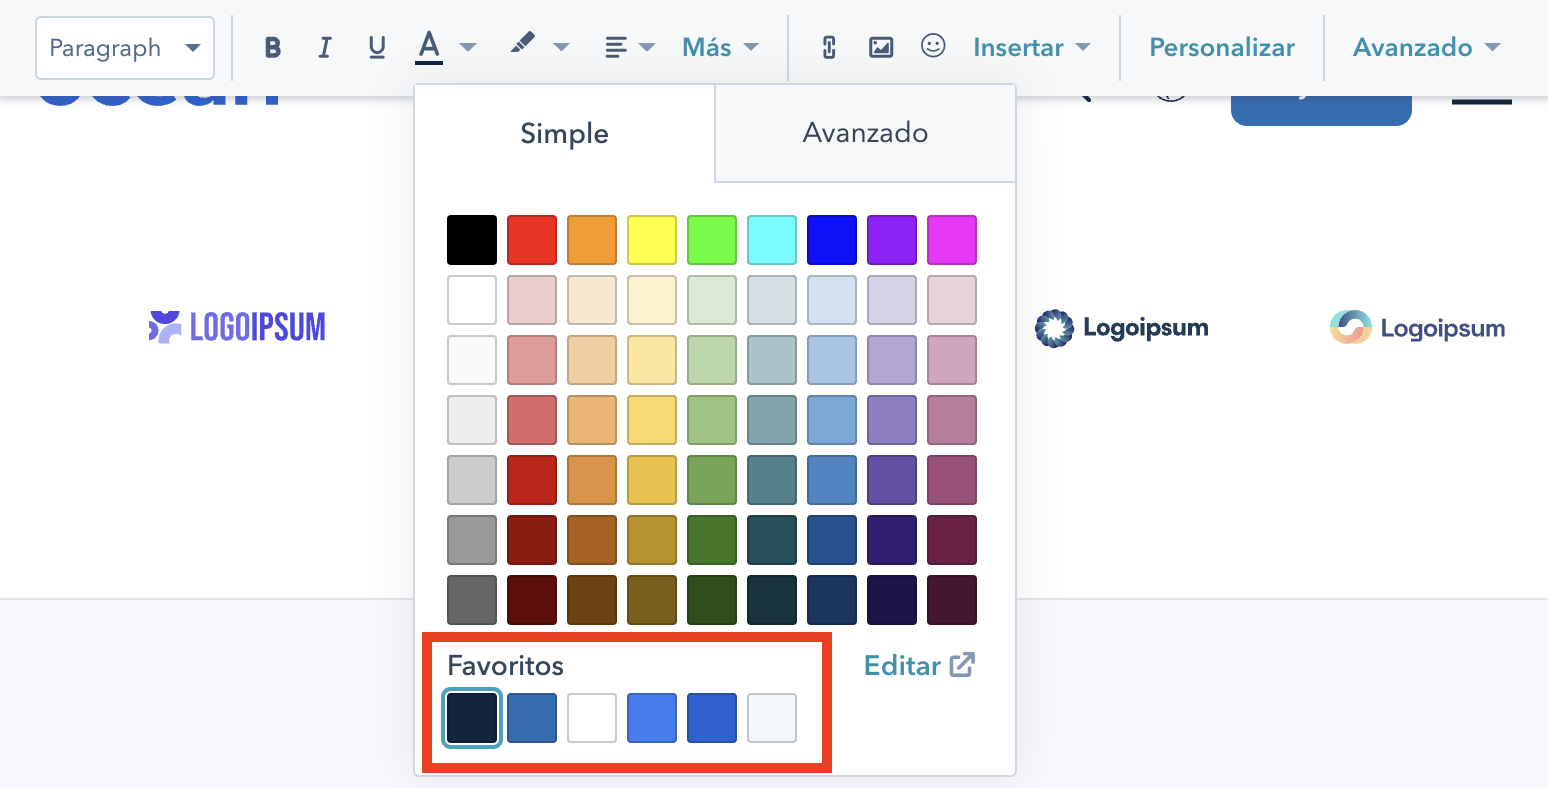
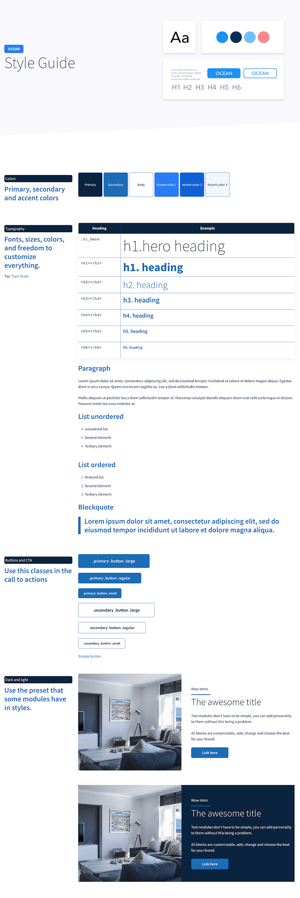
The first option is the colors, which are obtained from your previously established brand identity. If you skipped that step, no problem, you'll be able to change each color here.
Brand colors
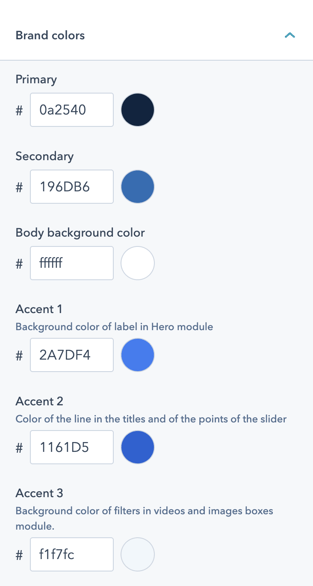
The primary color is used in paragraphs, lists, tables, form labels, among other elements.
The secondary color is used for the text headers and in the background of the main buttons.
The Body background color, as its name implies, is the color used in the backgrounds of the page.
Accent 1 is used for some elements, such as the background of the main banner tags; Accent 2 is used in the points of the logo galleries and, finally, Accent 3 is used in the backgrounds of the filters and other elements.
Both Body background color and Accent 3 preferably require light colors.
Let's go now to the Sources
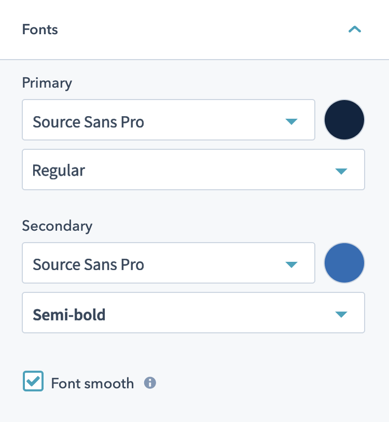
In Ocean Pro, fonts are taken from Google Fonts. In case you require a custom font, you can contact us to help you activate it. For this, it is important that the files in .ttf and .wolf format are loaded in the your account files.
If your brand fonts are from Google, then you should choose a Primary font for all text and a Secondary font for headings. The colors of both fonts are copied from the previously entered values; you can change them or leave them.
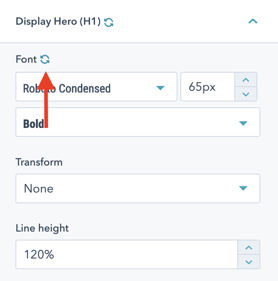
Now let's move on to fonts.
All types of fonts that are used on a page are configured here: headings, body, links, lists and quotation blocks of text.
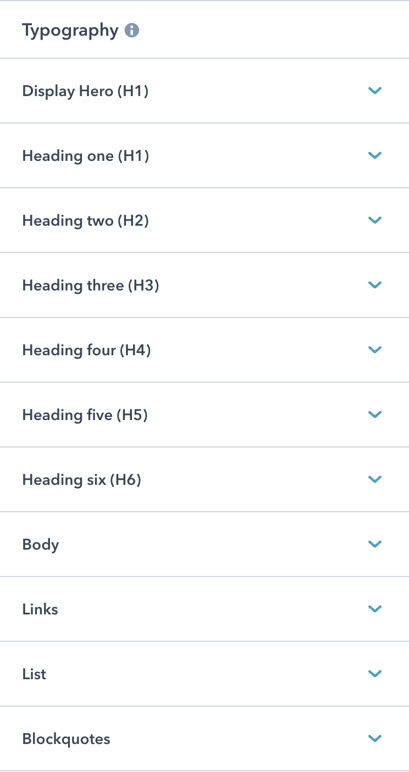
For each element you can customize the following options:
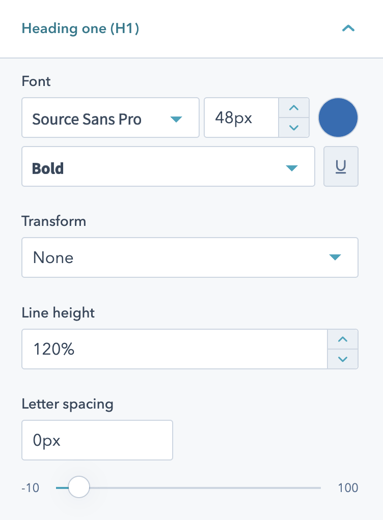
Choose a different font if it is the case, the color, the font style, choose if you want them to be all caps, the height of the lines of text and the spacing of the letters.
As you make these changes, you can view the settings on the Style Guide page.
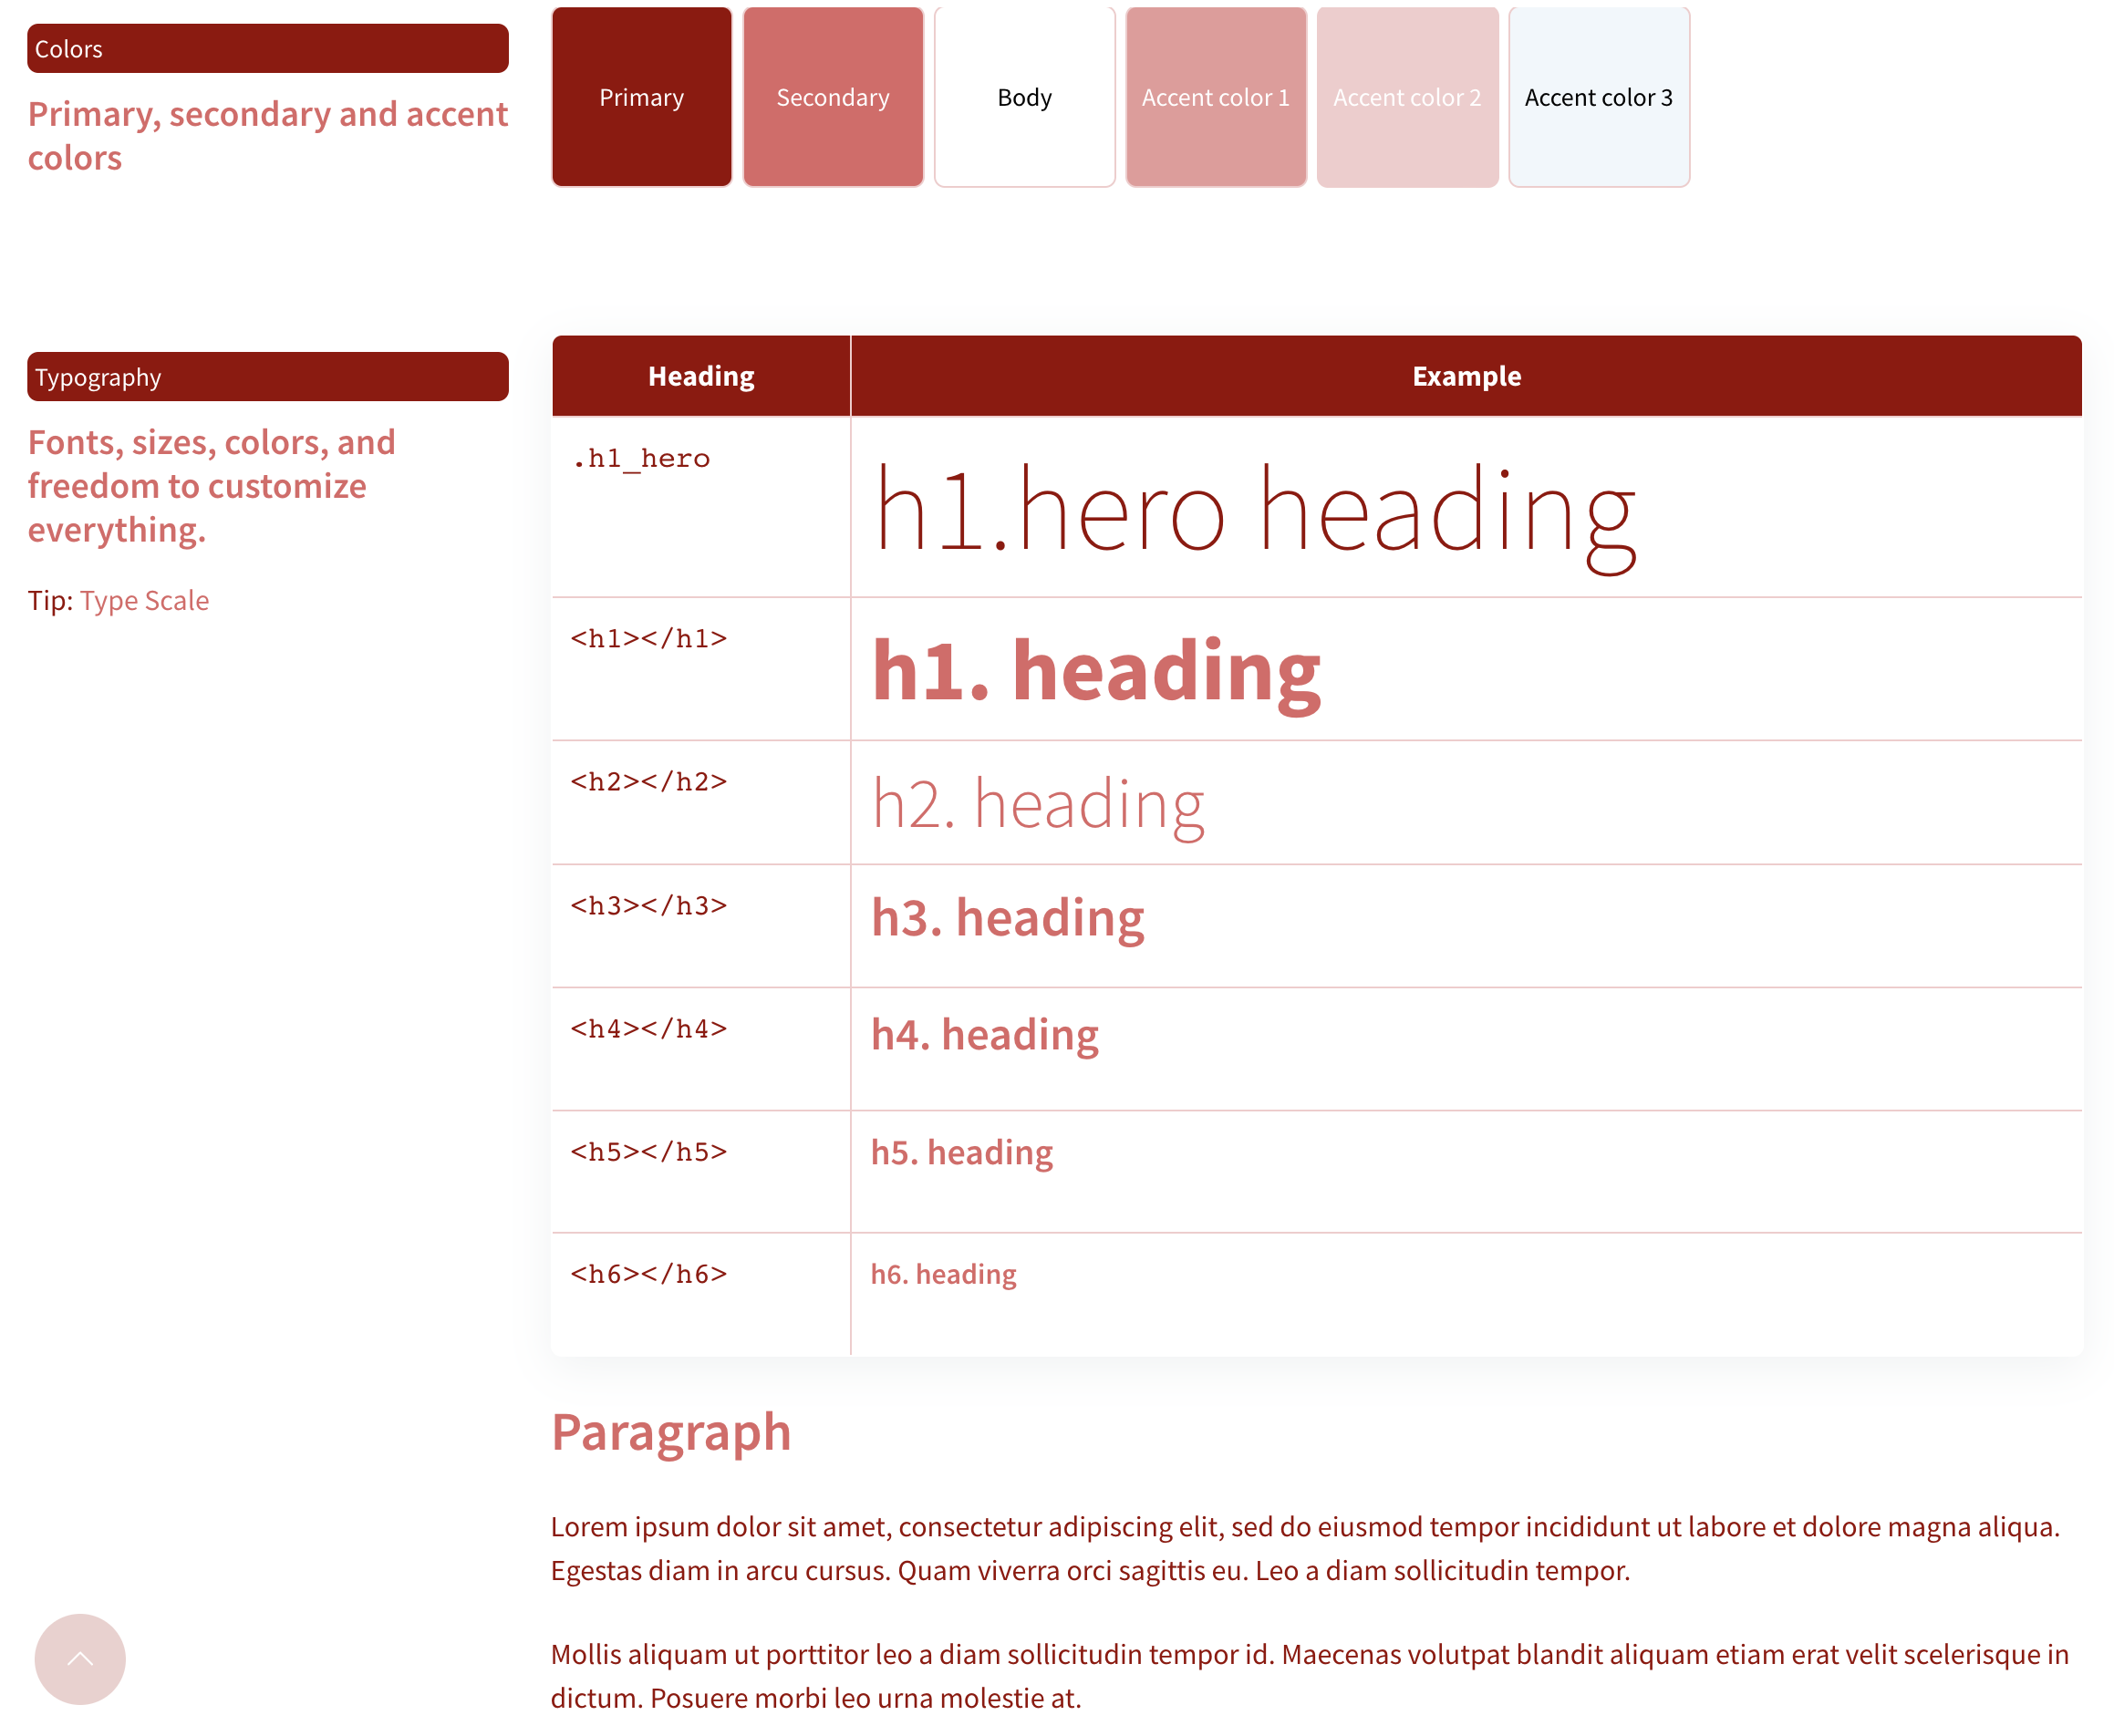
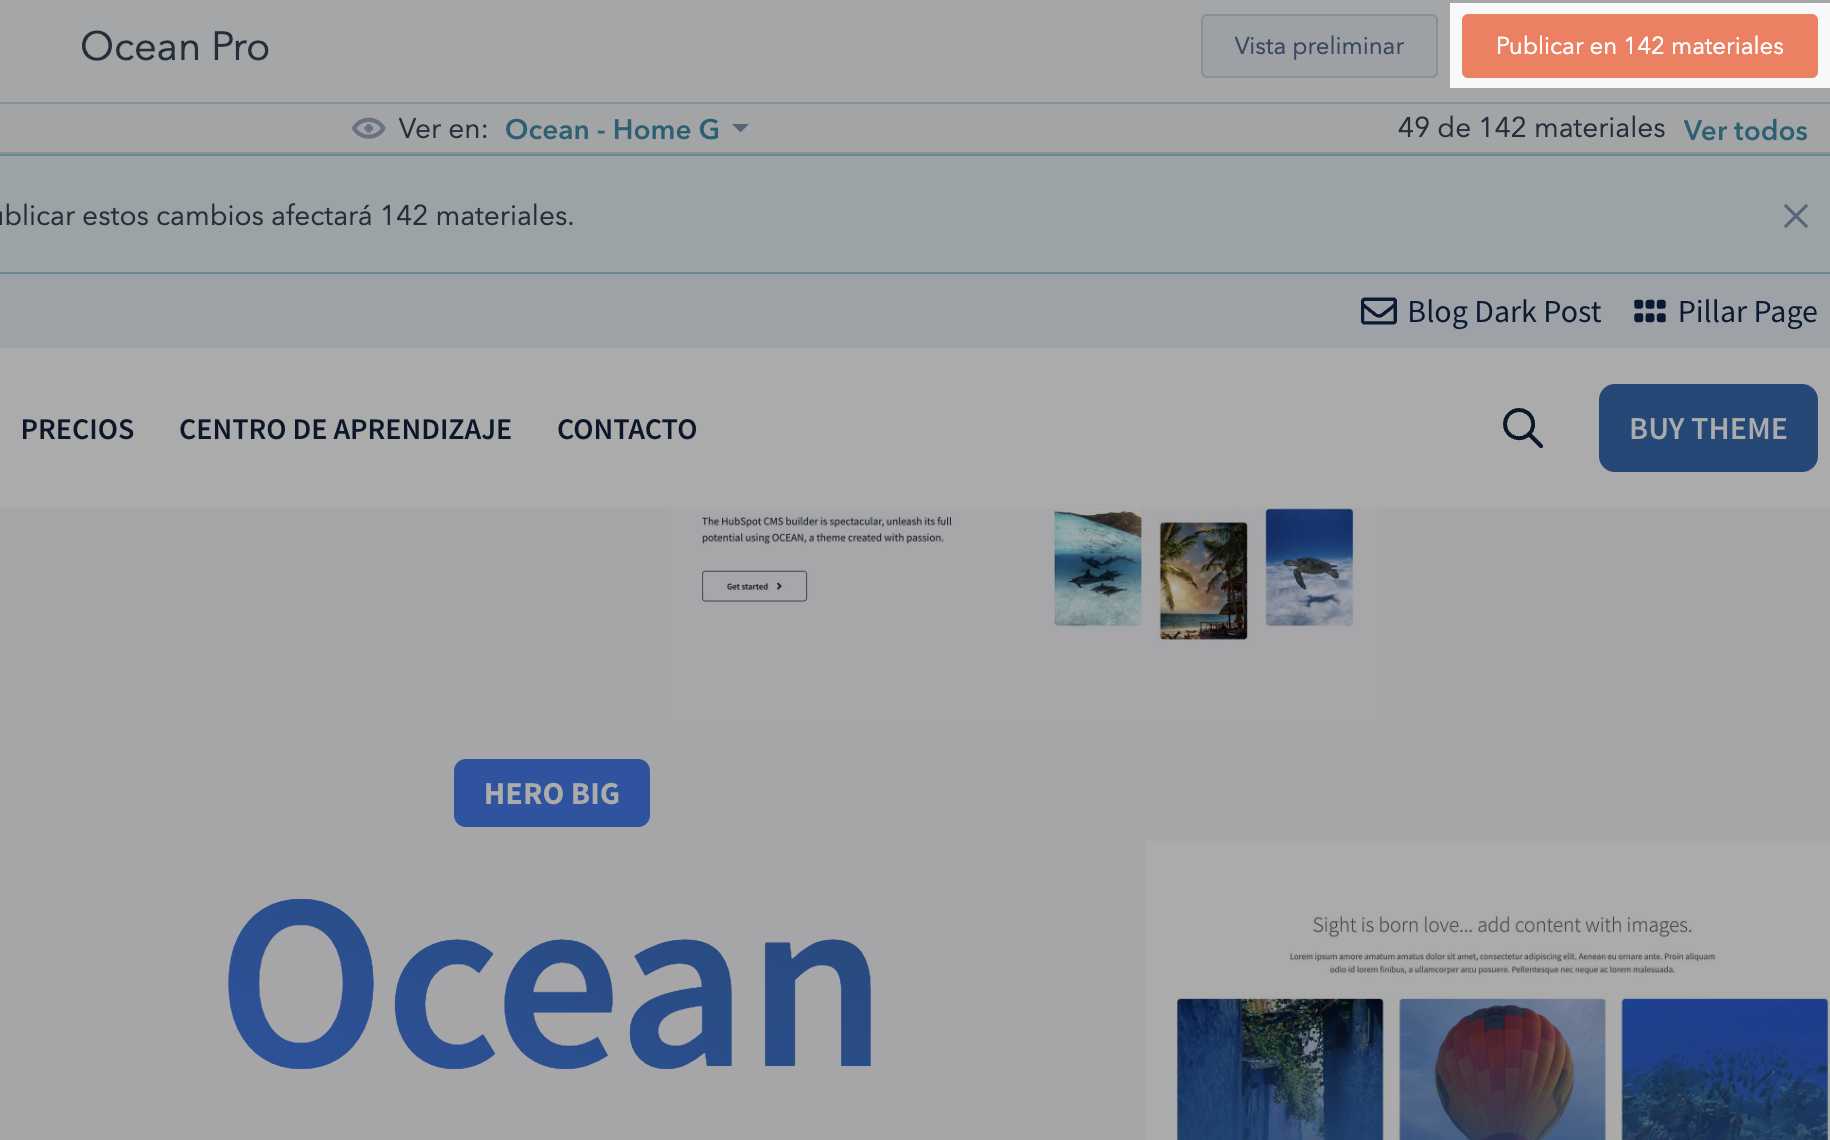
With the View in selector:
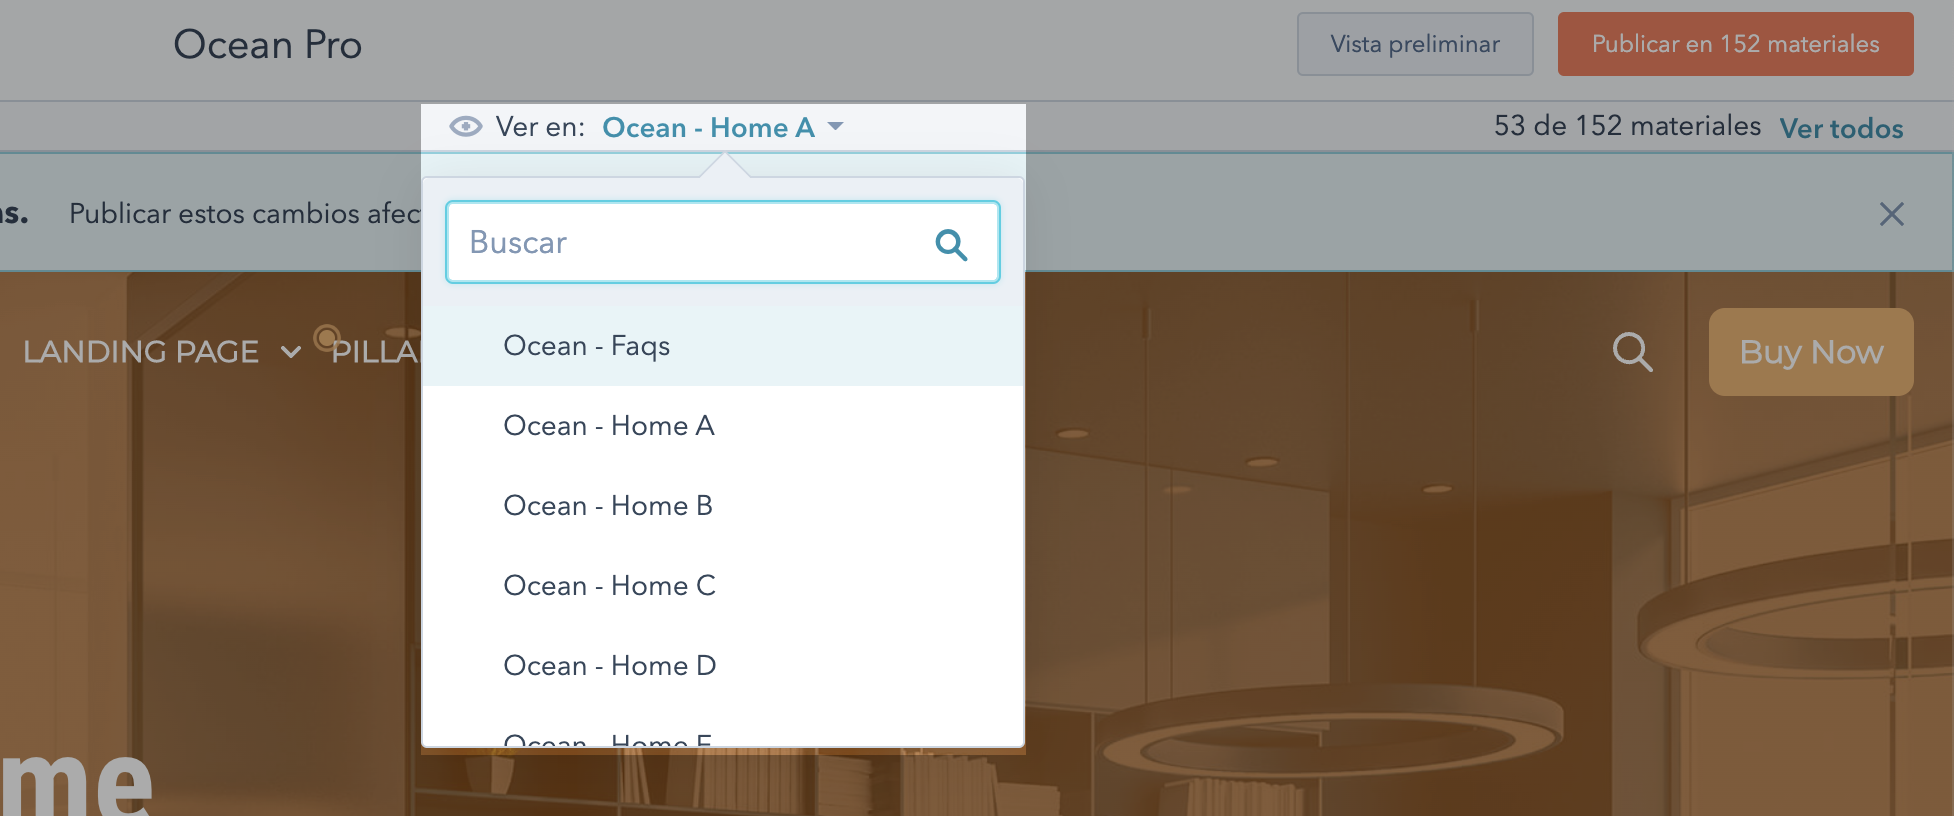
You can switch to another template to observe the changes.
This way you will be able to visualize the adjustments that occur; the rest of the options have the same impact on each element included in the templates.
You can always return to the initially set value, you just have to click on this icon.
When you finish the whole process of configuring the elements that you consider necessary to edit, click publish so that your changes are visible when creating the pages.
You can revert the changes without any problem. So do not worry.
Now you can share your style guide with the rest of the team and get feedback on it, using the Preview button.
Once these adjustments have been made, it is time to move on to the next week.
Third week: Create the home and service pages
This week we will create the Home and Services pages, which are usually the most important.
To keep an order, we will use excel and the documents that have the contents of the pages; that will help you do a review after creation.
The first thing to do is create the Site Navigation Menu. To do this, go to Navigation and create the main menu.

Add parent elements and, if necessary, add child elements.
In the link type for this part, create No Link elements, which you will later change.
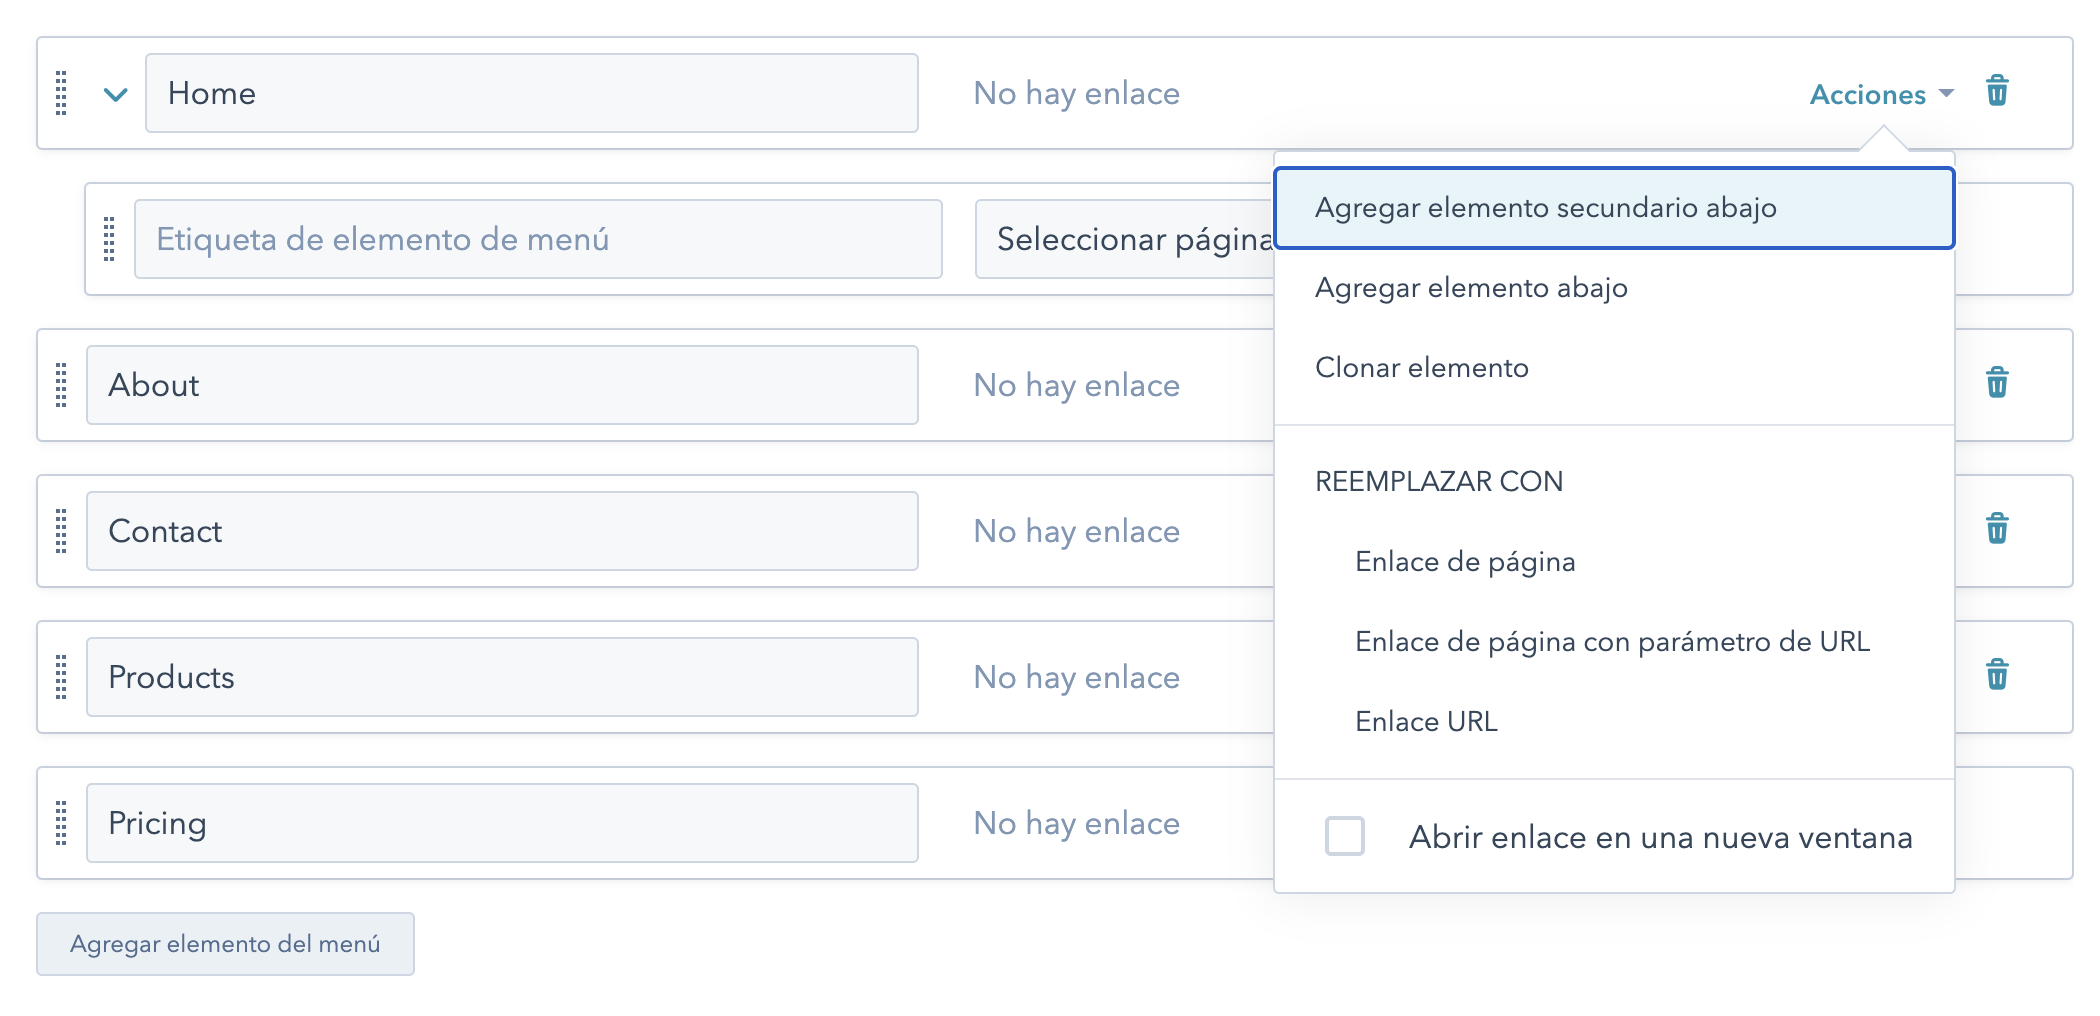
When your menu is ready, click publish and you are done.
Now we are going to create a second menu, which we will use for the footer of the page. To do so, from the name, click Add menu.
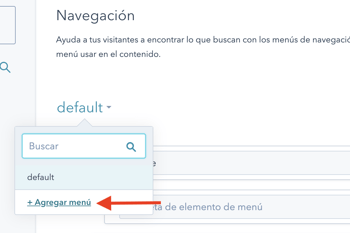
Put the name Footer and add the elements you need.
In case your site has more than one language, you must create a menu for each one.
At this point, as I told you, none of the menu items have links, but it will help us visually make the header look like it should.
When you are done making the pages, go back to editing the menus to change the link to the corresponding page.
Now let's start with the home page.
Go to website o content preparation if it is redesign.
Click Create > Create Website Page.
Once you enter the name, it will show you the templates available in Ocean Pro.
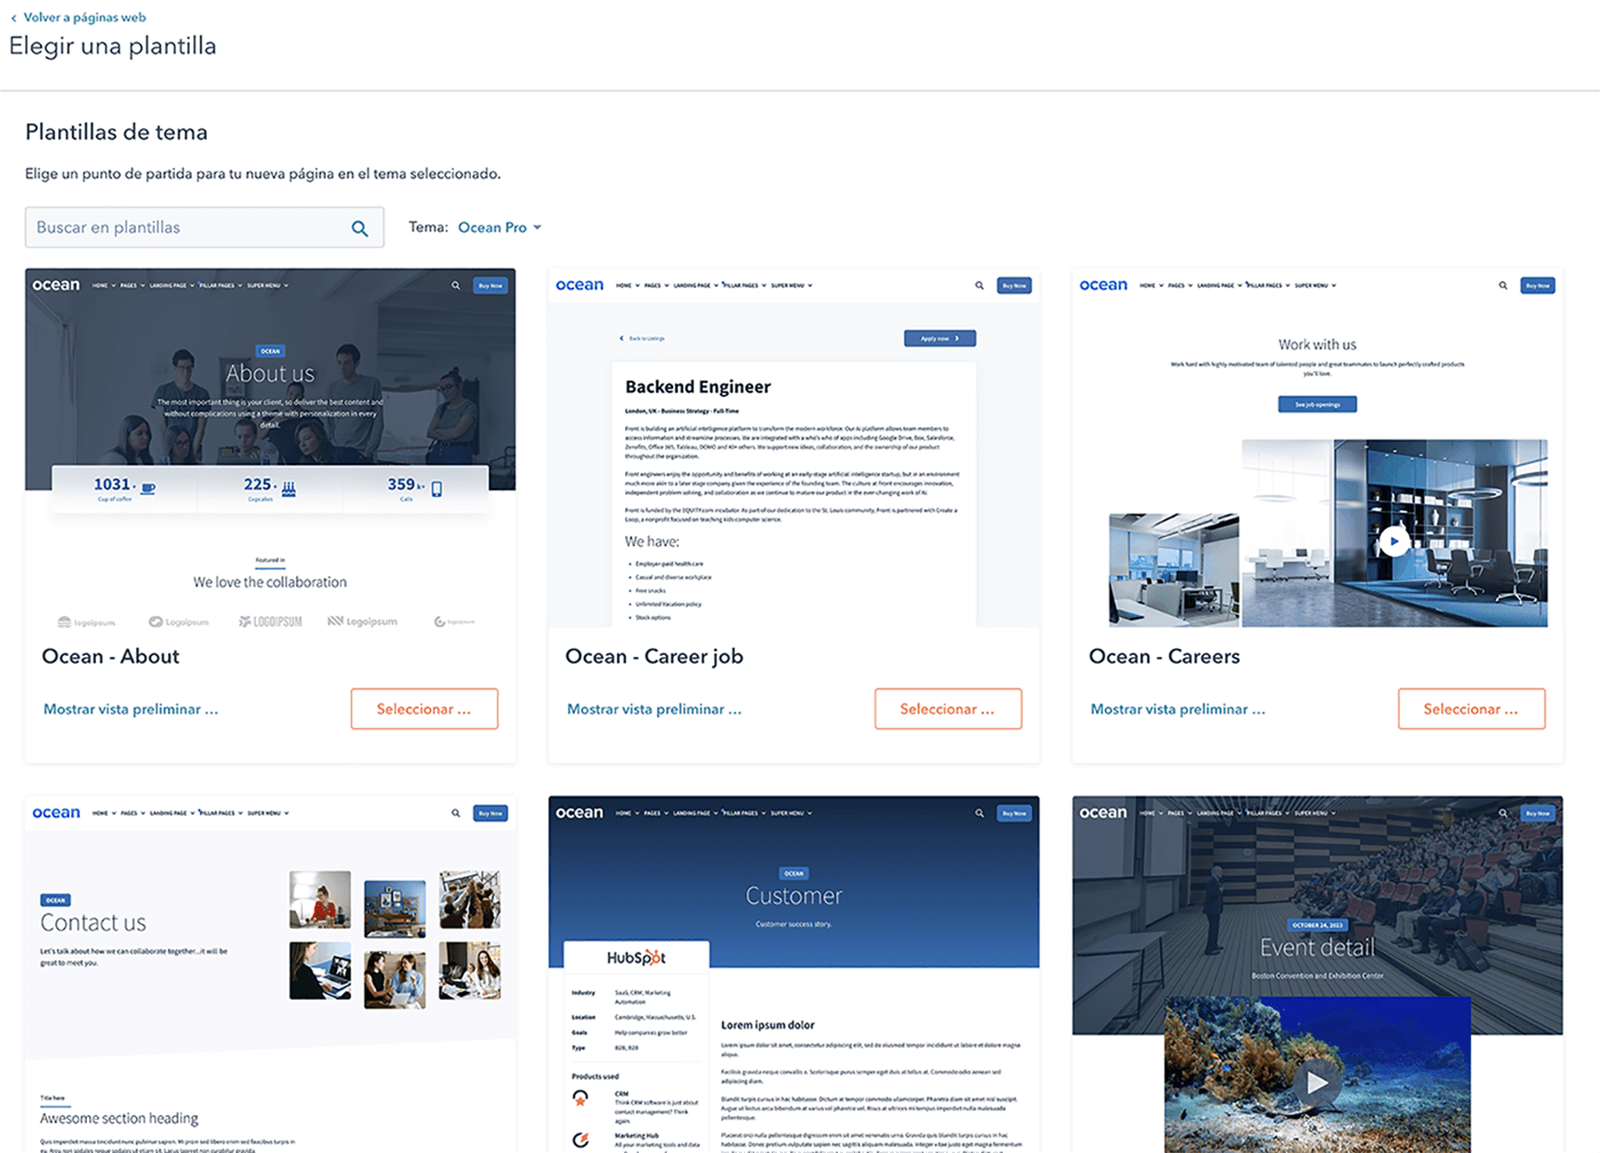
At this point, you can choose the template that best suits the content you have for the main page.
The templates give you an idea of how you can use the modules, so from the chosen template, you can remove modules, change columns, among other details according to your needs.
How to edit a custom module.
Editing custom modules
Templates are made up of flexible custom modules that, depending on the type, you can use in one or more columns; Both the custom modules included in Ocean Pro and HubSpot's default modules have two tabs.
Content: this tab contains the content that is displayed in the module, such as some controls that, in some cases, change the appearance.
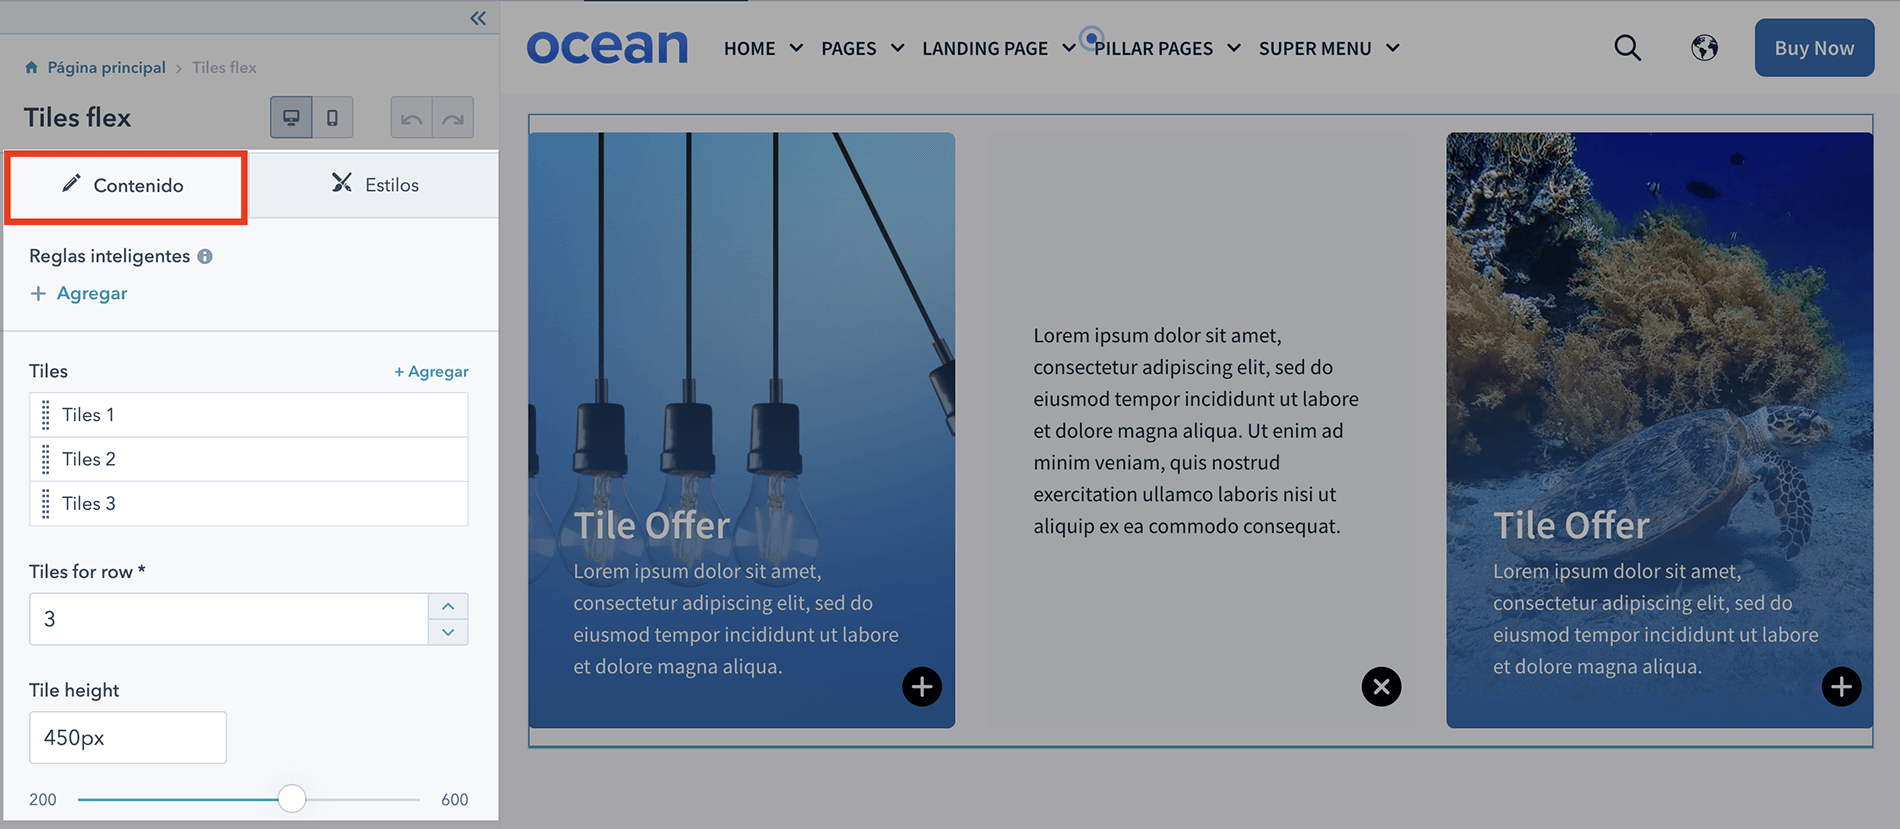
Styles: On this tab are options that change the appearance of displayed items, such as colors, spacing, borders, and in some cases, font.
Options vary depending on the custom module.
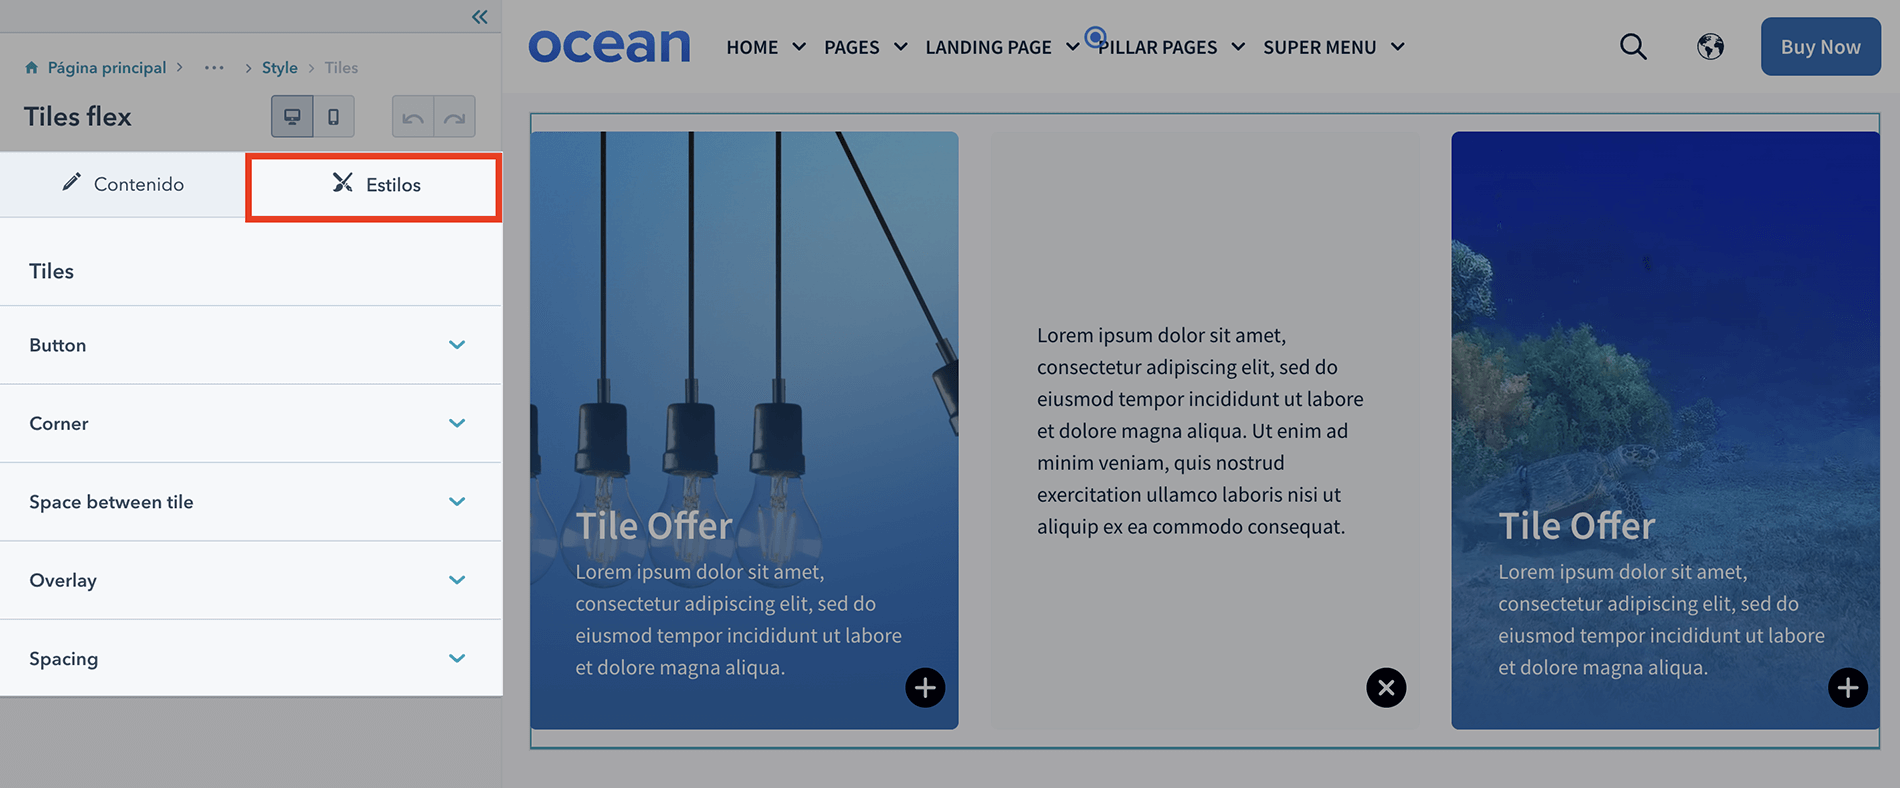
You can combine the custom modules with the options available in the sections, which have style options.
To access section options, hover the menu over a section and click Style Section.
See what you can achieve using the HubSpot builder with a section in the video below.
Modify the width of a column, change the arrangement of a module, delete it, add a background to the section, edit the width of the section or add a section that you need to fill the width.
You can add new modules to established sections in the template of your choice or create new sections; doing it is very easy:
The main advantage of Ocean Pro is that most of the custom modules can be combined, either in one or multiple columns, as you could see in the previous video.
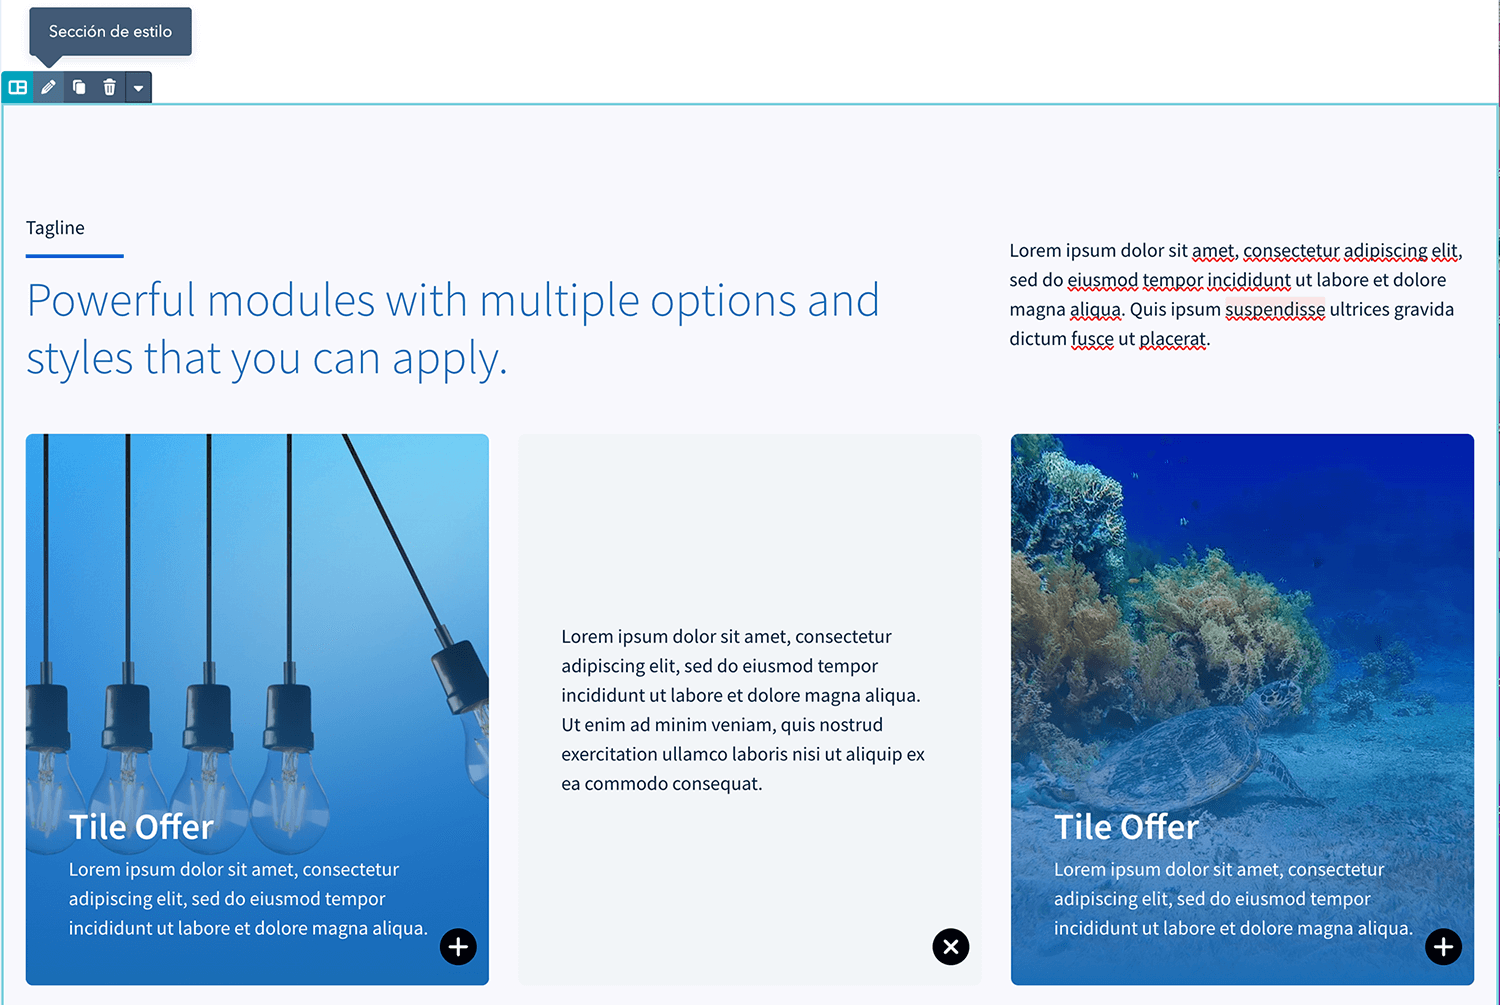
Besides the templates, you have Sections that we have saved for you to reuse.
Let's look at a section that combines multiple modules into a two-column section, adding a video background to the entire section, because the fact that you can build a section with multiple custom modules doesn't limit you from creating a spectacular section.
Have you seen how easy it is to add a video to a section, add dividers and be able to edit them? All of this, combined with HubSpot's CMS builder options, will make your website sections spectacular.
One more advantage is that if any of the sections are repeated on more than one page, you can save them for later use.
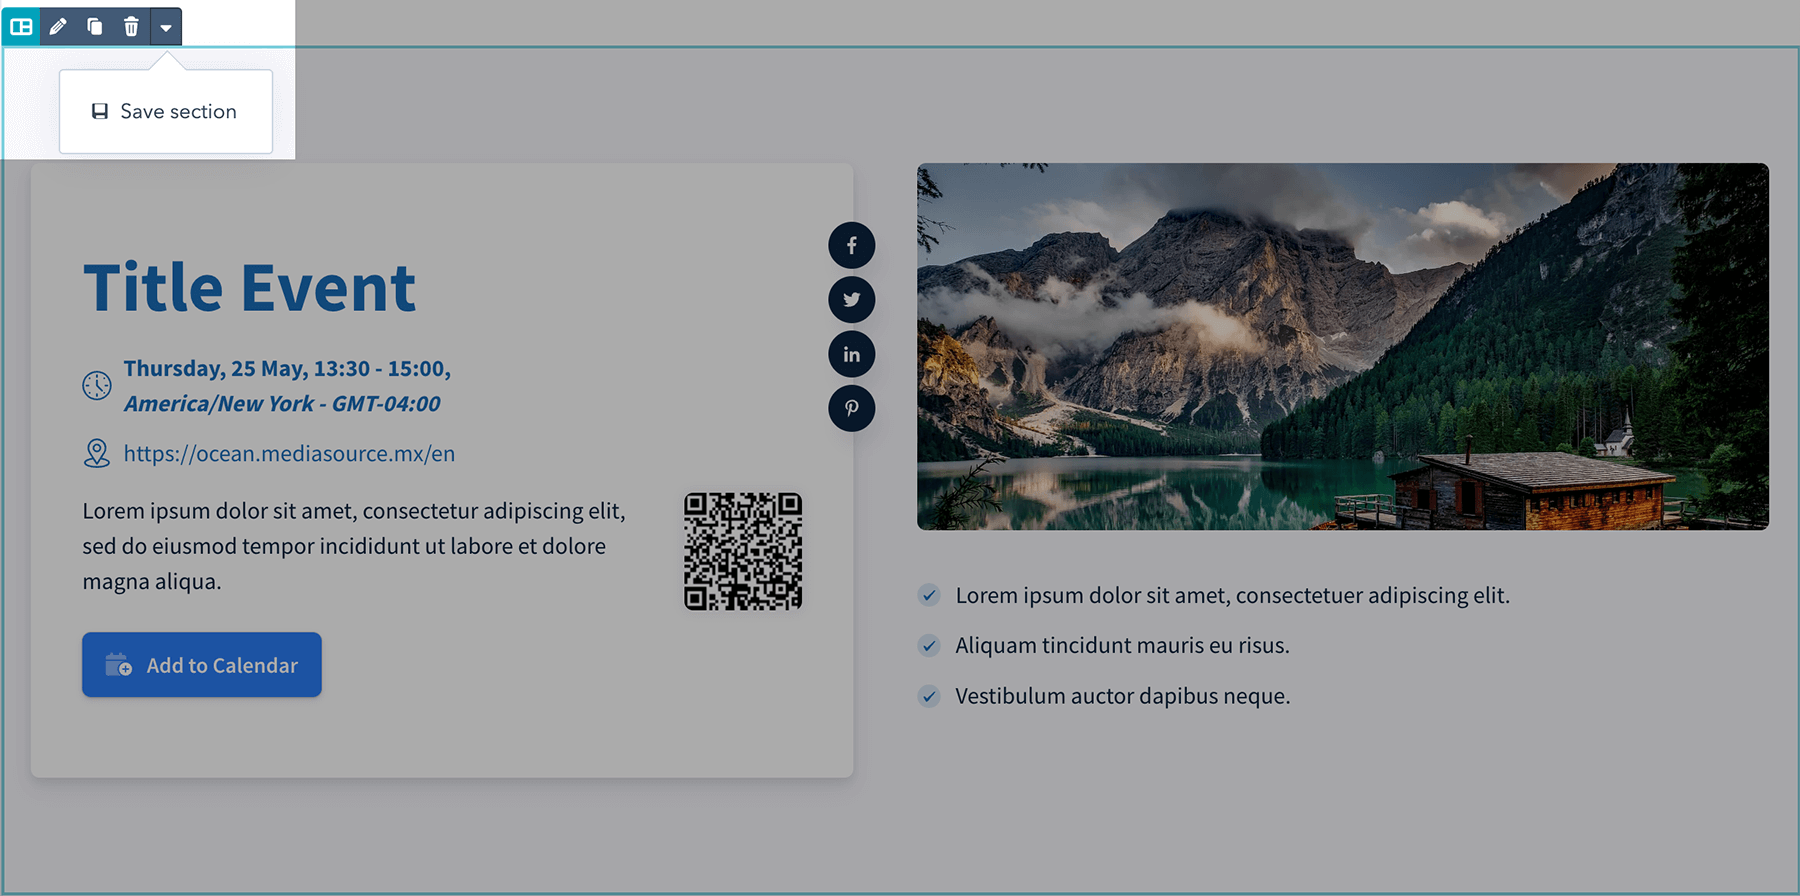
To be able to manipulate the sections, columns and rows you must always click on Home in the left sidebar:
That way, you can select sections, columns and rows.
Now it is time to complete the main page and the high priority sections such as services.
Week 4: Secondary Pages, Header and Footer
We are already in the fourth week and it is time to add the secondary pages such as About, Team, Contact and Legal Pages.
Ocean Pro has templates for each of these sections and completing them should not be a problem. Remember that you can add a touch of personalization if you require it.
Now that you have completed the child pages, it is time to edit the header and footer.
For the header, you need to fill in the links in the menu, both primary and secondary. At this point, all of your pages should be published; In case of a redesign, make sure you do not make any changes to the URL of high importance pages.
If your page in the previous CMS has the following slug: mediasource.mx/hubspot, in HubSpot's CMS it must be the same to avoid losing traffic.
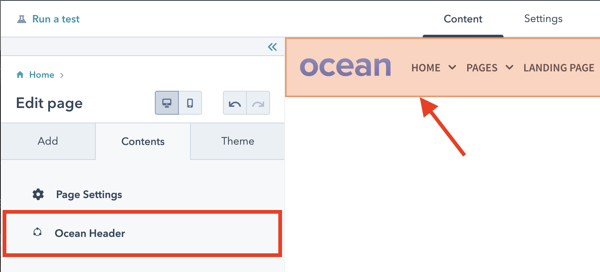
With the menu complete, it is time to edit the header; for this, you just have to access from any page and click on the header or on Ocean Header in the content tab:
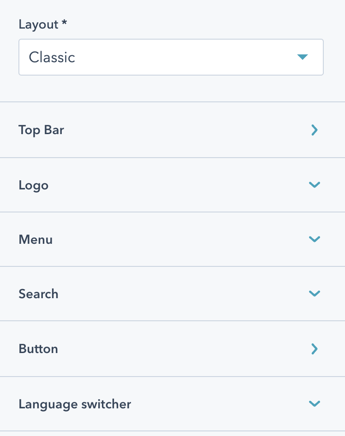
Ocean Pro has multiple options for the header, from activating a small line of links, to setting up a spectacular Mega Menu easily and without any coding:
In the logo, you must add two versions: one that is shown when the header is transparent and another, for when the header has some color. You can change the background color and other options in the Styles tab:

Note: The language selector is not displayed unless the page has a language variation.
In the case of the footer, Ocean Pro uses drag and drop functionality in that global module, so you will be able to change it entirely.
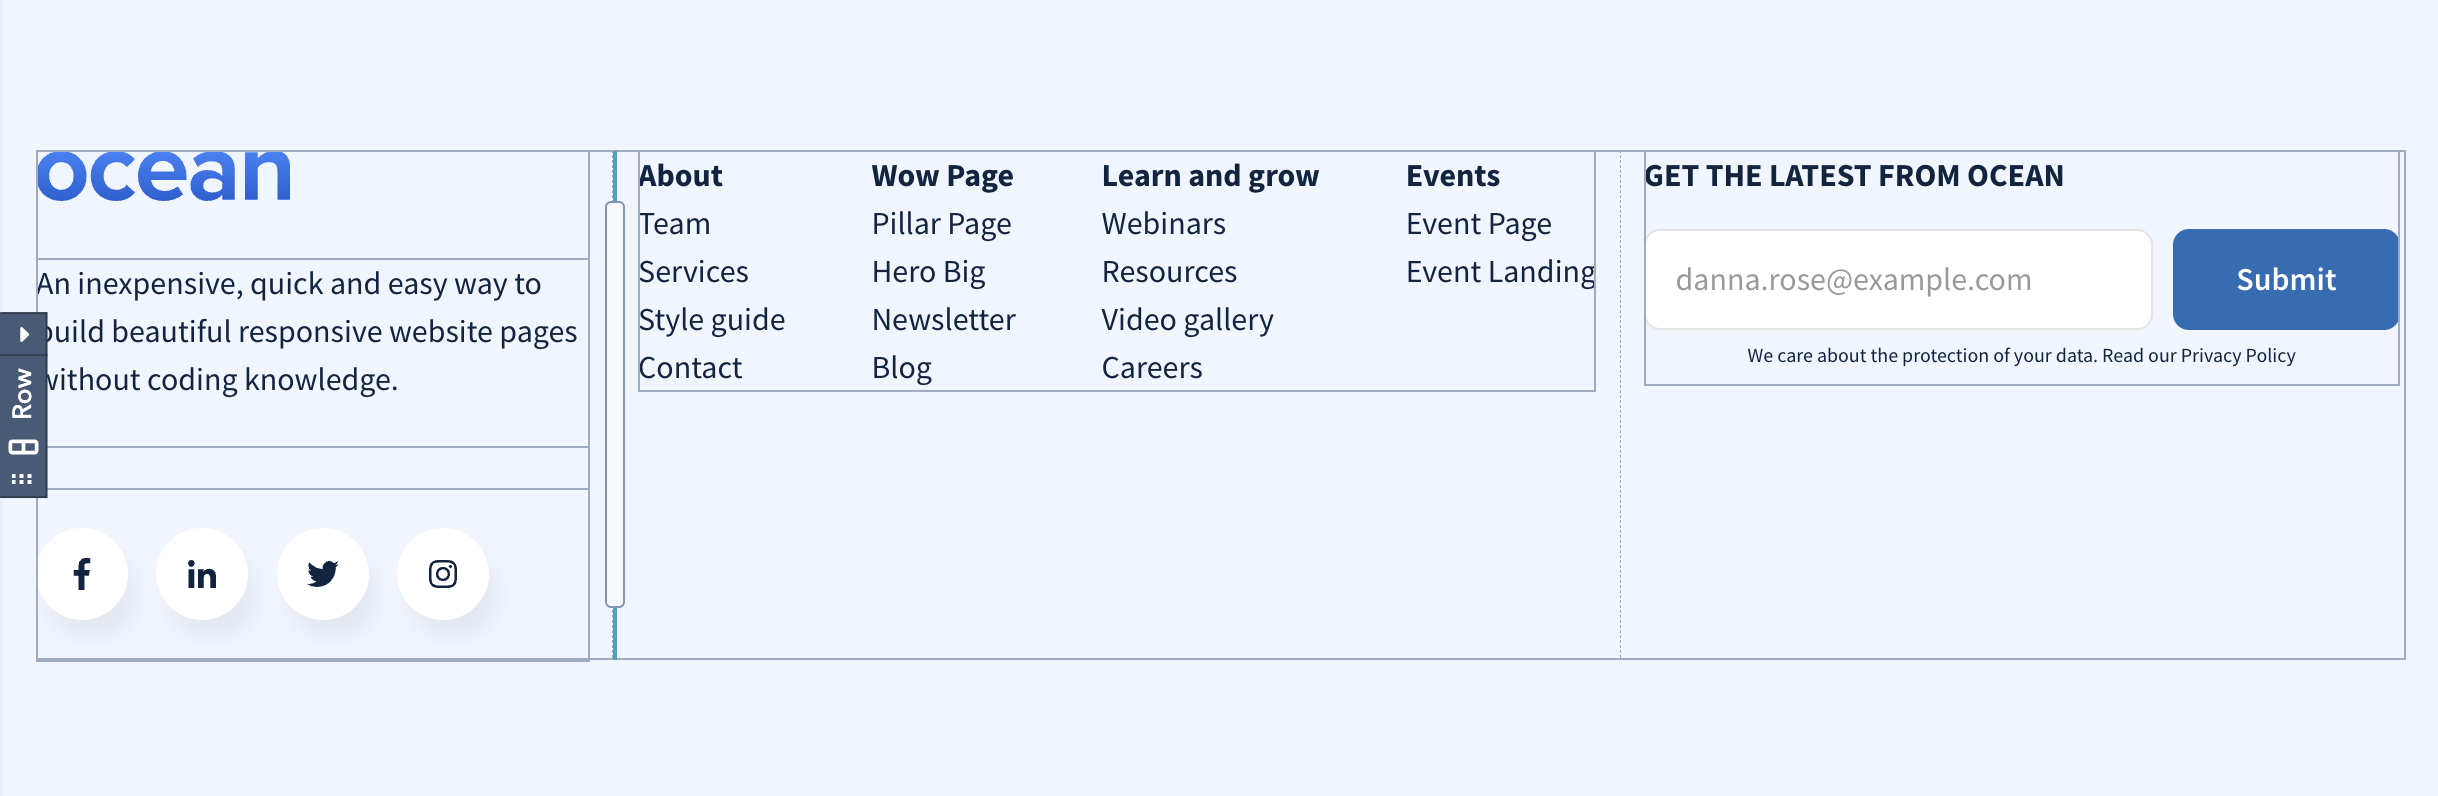
You can remove or add other custom modules or columns.
Now that you have your header and footer ready, it is time for a general review of all the pages you have created.
Make sure links and calls to action work as they should. Once verification is complete, you can publish the version if you used Stage or connect your domain to HubSpot's CMS, so that your new site is visible on your domain.
To do so, follow HubSpot's instructions. adding the domain to your HubSpot account..
After completing the setup, wait a couple of hours. HubSpot will set up an SSL and do everything necessary so that once the domain is migrated to HubSpot, everything works like a charm.
Blog Templates in Ocean Pro
It is time to start planning the content that you are going to publish on the blog to attract your potential customers.
Ocean Pro comes with a blog template and various layouts that you can choose from the theme settings. To choose the Ocean Pro template, you just have to enter the Templates options from the blog setup.
And ready! You have everything you need to launch your website in 28 days with Ocean Pro and HubSpot CMS. It is that easy to do it!
Conclusion
You already have your website redesigned with Ocean Pro, so it is time for you to celebrate.
Although I must say that the best is coming, do not forget to create content for your potential customers to find you.
In case you have doubts about how to do something with a module, do not hesitate to contact us. It will be a pleasure to help you.
Still not convinced with Ocean Pro? Schedule a demo!

